Contributed by Joseph Czarnecki, Richard
Worth, Matthias C. Noch, Mark E. Horan and Tony DiGiulian
Imperial Japanese Navy
Naval General StaffAdmiral Nagano Osami
Combined Fleet
Admiral Yamamoto Isoroku
First Air Fleet
Vice Admiral Nagumo
Chuichi
First Carrier Division
Vice Admiral Nagumo
Chuichi
CV AkagiCaptain Hasegawa Kiichi
Air OfficerCommander Masuda
Shogo
VTB LeaderCommander
Fuchida Mitsuo
1st Squadron
(5xB5N2 "Kate")CDR Fuchida
2nd Squadron
(5xB5N2 "Kate")
3rd Squadron
(5xB5N2 "Kate")
VT LeaderLCDR Murata
1st Squadron
(3xB5N2 "Kate")LCDR Murata Shigeharu
2nd Squadron
(3xB5N2 "Kate")
3rd Squadron
(3xB5N2 "Kate")
4th Squadron
(3xB5N2 "Kate")
VB LeaderLT Chihaya
21st Squadron
(3xD3A1 "Val")LT Chihaya
22nd Squadron
(3xD3A1 "Val")
23rd Squadron
(3xD3A1 "Val")
25th Squadron
(3xD3A1 "Val")
26th Squadron
(3xD3A1 "Val")
27th Squadron
(3xD3A1 "Val")
VF LeaderLCDR Itaya
1st FCU Wave
1 (9xA6M2 "Zeke")LCDR Itaya Shigeru
1st FCU Wave
2 (9xA6M2 "Zeke")LT Shindo
CAP (9xA6M2 "Zeke")
CV KagaCaptain Okada Jisaku
Air OfficerCommander Sata
Naohito
VTB Leader--LCDR Hashiguchi
1st Sqdn (5xB5N2
"Kate")LCDR Hashiguchi
2nd Squadron
(5xB5N2 "Kate")
3rd Squadron
(5xB5N2 "Kate")
VT LeaderLT Kitajima
1st Squadron
(3xB5N2 "Kate")LT Kitajima
2nd Squadron
(3xB5N2 "Kate")
3rd Squadron
(3xB5N2 "Kate")
4th Squadron
(3xB5N2 "Kate")
VB LeaderLT Makino
21st Squadron
(3xD3A1 "Val")LT Makino
22nd Squadron
(3xD3A1 "Val")
23rd Squadron
(3xD3A1 "Val")
24th Squadron
(3xD3A1 "Val")
25th Squadron
(3xD3A1 "Val")
26th Squadron
(3xD3A1 "Val")
27th Squadron
(3xD3A1 "Val")
28th Squadron
(3xD3A1 "Val")
29th Squadron
(3XD3A1 "Val")
VF LeaderLT Shiga
2nd FCU Wave
1 (9xA6M2 "Zeke")LT Shiga
2nd FCU Wave
2 (9xA6M2 "Zeke")LT Nikaido
CAP (9xA6M2 "Zeke")
Destroyer Division 7 (Midway
Attack Unit)
DD Ushio (Fubuki Class)
DD Sazanami (Fubuki Class)
Second Carrier Division
Rear Admiral Yamaguchi
Tamon
CV SoryuCaptain Yanagimoto Ryusaku
Air OfficerCommander Kusumoto
Ikuto
VTB LeaderLT Abe
1st Squadron
(5xB5N2 "Kate")LT Abe
2nd Squadron
(5xB5N2 "Kate")
VT LeaderLT Nagai
1st Squadron
(2xB5N2 "Kate")LT Nagai
2nd Squadron
(2xB5N2 "Kate")
3rd Squadron
(2xB5N2 "Kate")
4th Squadron
(2xB5N2 "Kate")
VB LeaderLCDR Egusa
21st Squadron
(3xD3A1 "Val")LCDR Egusa Takeshige
22nd Squadron
(3xD3A1 "Val")
23rd Squadron
(3xD3A1 "Val")
24th Squadron
(3xD3A1 "Val")
25th Squadron
(3xD3A1 "Val")
26th Squadron
(3xD3A1 "Val")
VF-LeaderLT Suganami
3rd FCU Wave
1 (9xA6M2 "Zeke")LT Suganami
3rd FCU Wave
2 (9xA6M2 "Zeke")LT Iida
CAP (9xA6M2 "Zeke")
CV HiryuCaptain Kaku Tomeo
Air OfficerCommander Amagai
Takahisa
VTB LeaderLCDR Kosumi
1st Squadron
(5xB5N2 "Kate")LCDR Kosumi
2nd Squadron
(5xB5N2 "Kate")
VT LeaderLT Matsumura
1st Squadron
(2xB5N2 "Kate")LT Matsumura
2nd Squadron
(2xB5N2 "Kate")
3rd Squadron
(2xB5N2 "Kate")
4th Squadron
(2xB5N2 "Kate")
VB LeaderLT Kobayashi
21st Squadron
(3xD3A1 "Val")LT Kobayashi
22nd Squadron
(3xD3A1 "Val")
23rd Squadron
(3xD3A1 "Val")
24th Squadron
(3xD3A1 "Val")
25th Squadron
(3xD3A1 "Val")
26th Squadron
(3xD3A1 "Val")
VF LeaderLT Okajima
4th FCU Wave
1 (6xA6M2 "Zeke")LT Okajima
4th FCU Wave
2 (9xA6M2 "Zeke")LT Nono
CAP (9xA6M2 "Zeke")
Fifth Carrier Division
Rear Admiral Hara Chuichi
CV Shokaku (Shokaku Class)Captain
Jojima Takatsugu
Air OfficerCommander Wada
Tetsujiro
VTB LeaderLCDR Shimazaki
1st Sqdn (9xB5N2
"Kate")LCDR Shimazaki Shigekazu
2nd Squadron
(9xB5N2 "Kate")
3rd Squadron
(9xB5N2 "Kate")
VB LeaderLCDR Takahashi
1st Sqdn (9xD3A1
"Val")LCDR Takahashi Kakuichi
2nd Squadron
(9xD3A1 "Val")
3rd Squadron
(9xD3A1 "Val")
VF LeaderLT Kaneko
5th FCU Wave
1 (6xA6M2 "Zeke")LT Kaneko
CAP (9xA6M2 "Zeke")
CV Zuikaku (Shokaku Class)Captain
Yokokawa Ichibei
Air OfficerCommander Shimoda
Hisao
VTB LeaderLT Ichihara
1st Squadron
(9xB5N2 "Kate")LT Ichihara
2nd Squadron
(9xB5N2 "Kate")
3rd Squadron
(9xB5N2 "Kate")
VB LeaderLCDR Sakamoto
1st Sqdn (9xD3A1
"Val")LCDR Sakamoto Akira
2nd Squadron
(9xD3A1 "Val")
3rd Squadron
(9xD3A1 "Val")
VF LeaderLT Sato
6th FCU Wave
1 (6xA6M2 "Zeke")LT Sato
CAP (9xA6M2 "Zeke")
DD Akigumo (Yugumo Class)
Battleship Division 3
Vice Admiral Mikawa
Gunichi
BB Hiei
BB Kirishima
Cruiser Division 8
CA Tone
CA Chikuma
Destroyer Squadron 1
Rear Admiral Omori
Sentaro
CL Abukuma (Nagara Class)
Destroyer Division 17
DD Urakaze (Kagero Class)
DD Isokaze (Kagero Class)
DD Tanikaze (Kagero Class)
DD Hamakaze (Kagero Class)
Destroyer Division 18
(Detached from DesRon
2)
DD Kagero (Kagero Class)
DD Shiranuhi (Kagero Class)
DD Arare (Asashio Class)
DD Kasumi (Asashio Class)
Midway Destruction Unit
Captain Ohishi Kaname
DD Akebono (Fubuki Class)
DD Ushio (Fubuki Class)
Submarine Division 2
Captain Imaizumi Kijiro
SS I-19 (I-15 Class/Type B1)
SS I-21 (I-15 Class/Type B1)
SS I-23 (I-15 Class/Type B1)
1st Supply Train
AO Kyokuto Maru (Merchant conversion)
AO Kenyo Maru (Merchant conversion)
AO Kokuyo Maru (Merchant conversion)
AO Shinkiku Maru (Merchant conversion)
AO Akebono Maru (Merchant conversion)
2nd Supply Train
AO Toho Maru (Merchant conversion)
AO Toei Maru (Merchant conversion)
AO Nippon Maru (Merchant conversion)
Sixth (Submarine) Fleet
Vice Admiral Shimizu
Mitsumi
1st Submarine Squadron
Rear Admiral Sato Tsutomu
SS I-9 (I-9 Class/Type A1)
SS I-15 (I-15 Class/Type B1)
SS I-17 (I-15 Class/Type B1)
SS I-25 (I-15 Class/Type B1)
2nd Submarine Squadron
Rear Admiral Yamazaki
Shigeaki
SS I-7 (I-7 Class/Type J3)
SS I-1 (I-1 Class/Type J1)
SS I-2 (I-1 Class/Type J1)
SS I-3 (I-1 Class/Type J1)
SS I-4 (I-1 Class/Type J1)
SS I-5 (I-5 Class/Type J1M)
SS I-6 (I-6 Class/Type J2)
3rd Submarine Squadron
Rear Admiral Miwa Shigeyoski
SS I-8 (I-7 Class/Type J3)
SS I-68 (I-68 Class/Type KD6A)
SS I-69 (I-68 Class/Type KD6A)
SS I-70 (I-68 Class/Type KD6A)
SS I-71 (I-68 Class/Type KD6A)
SS I-72 (I-68 Class/Type KD6A)
SS I-73 (I-68 Class/Type KD6A)
SS I-74 (I-74 Class/Type KD6B)
SS I-75 (I-74 Class/Type KD6B)
Special Attack Unit
Captain Sasaki Hanku
(Mother Submarines Commander)
Lt. Naoji Iwasa (Mini-submarines
Commander)
SS I-22 (F) (I-16 Class/Type C1)
MSS I-22A (A type)
SS I-16 (I-16 Class/Type C1)
Lt. Cmdr. Hiroshi Hanabusa
MSS (mini-submarine) I-16
A (A type)Ensign Sakamaki Kazuo (USA's first POW)
SS I-18 (I-16 Class/Type C1)
MSS I-18A (A type)
SS I-20 (I-16 Class/Type C1)
MMS I-20A (A type)
SS I-24 (I-16 Class/Type C1)
MSS I-24A (A type)
Submarine Reconnaissance Unit
Commander Kashihara
Yasuchika
SS I-10 (I-9 Class/Type A1)
SS I-26 (I-26 Class/Type B1) Cmdr
Minoru Yokota
United States Navy
Chief of Naval Operations
Admiral Harold R. "Betty"
Stark
Commander in Chief, U.S. Fleet
Admiral Husband E.
"Mustapha" Kimmel
Battle Force (Task Force
1)
Vice Admiral William
S. Pye
Battleships, Battle Force
RADM Walter S. Anderson
Battleship Division 1
RADM Issac C. Kidd
BB-36 Nevada (Nevada
Class)Captain Francis W. Scanland
BB-38 Pennsylvania
(Pennsylvania Class)Captain Charles M. "Saavy" Cooke, Jr.
BB-39 Arizona (Pennsylvania
Class)Captain Franklin Van Valkenburg
Battleship Division 2
BB-37 Oklahoma (Nevada
Class)Captain Howard D. "Ping" Bode
BB-43 Tennessee (Tennessee
Class)
BB-44 California (Tennessee
Class)Captain Joel W. Bunkley
Battleship Division 4
RADM Walter S. Anderson
BB-46 Maryland (Colorado
Class)Captain D.C. Godwin
BB-48 West Virginia
(Colorado Class)Captain Mervyn Bennion
Cruisers, Battle Force
Rear Admiral H. Fairfax
Leary
Cruiser Division 6 (Partial)
CA-32 New Orleans (New Orleans
Class)
CA-38 San Francisco (New
Orleans Class)
Cruiser Division 9
Rear Admiral H. Fairfax
Leary
CL-46 Phoenix (Brooklyn
Class)
CL-48 Honolulu (Brooklyn
Class)
CL-49 St. Louis (St.
Louis Class)Captain George A. Rood
CL-50 Helena (St. Louis
Class)
Destroyers, Battle Force
Rear Admiral Milo F.
Draemel
Destroyer Flotilla 1
CL-7 Raleigh (Omaha
Class)
Destroyer Squadron
One
DD-360 Phelps
(Porter Class)
Destroyer Division
One
DD-349
Dewey (Farragut Class)
DD-350
Hull (Farragut Class)
DD-351
MacDonough (Farragut Class)
DD-352
Worden (Farragut Class)
Destroyer Division
Two
DD-348
Farragut (Farragut Class)
DD-353
Dale (Farragut Class)
DD-354
Monaghan (Farragut Class)
DD-355
Aylwin (Farragut Class)
Destroyer Squadron
Three
DD-357
Selfridge (Porter Class)
Destroyer Division
Five
DD-369
Reid (Mahan Class)
DD-371
Conyngham (Mahan Class)
DD-372
Cassin (Mahan Class)
DD-375
Downes (Mahan Class)
Destroyer Division
Six
DD-365
Cummings (Mahan Class)
DD-370
Case (Mahan Class)
DD-373
Shaw (Mahan Class)
DD-374
Tucker (Mahan Class)
Destroyer Flotilla 2
CL-8 Detroit (Omaha
Class)
DD-386 Bagley
DD-387 Blue
DD-388 Helm
DD-389 Mugford
DD-390 Ralph
Talbot
DD-391 Henley
DD-392 Patterson
DD-393 Jarvis
Other Destroyers
DD-66
Allen
DD-103 Schley
DD-106 Chew
DD-139 Ward
(patrolling Channel entrance to Pearl Harbor)
Submarines
SS-167 Narwhal
SS-169 Dolphin
SS-170 Cachalot
SS-199 Tautog
Minelayer
CM-4 Oglala
Minesweepers
AM-13 Turkey
AM-20 Bobolink
AM-26 Rail
AM-31 Tern
AM-43 Grebe
AM-52 Vireo
Coastal Minesweepers
AMC-8
Cockatoo
AMC-9
Crossbill
AMC-14
Condor
AMC-30
Reedbird
Destroyer Minelayers
DM-15
Gamble
DM-16
Ramsay
DM-17
Montgomery
DM-18
Breese
DM-19
Tracy
DM-20
Preble
DM-21
Sicard
DM-22
Pruitt
Destroyer Minesweepers
DMS-14 Zane
DMS-15 Wasmuth
DMS-16 Trever
DMS-17 Perry
Patrol Gunboat
PG-19 Sacramento
Destroyer Tenders
AD-3 Dobbin
AD-4 Whitney
Seaplane Tenders
AV-4 Curtiss
AV-8 Tangier
Small Seaplane Tenders
AVP-4 Avocet
AVP-7 Swan
Seaplane Tenders (Converted Destroyer)
AVD-6 Hulbert
AVD-11 Thornton
Ammunition Ship
AE-1 Pyro
Oilers
AO-12 Ramapo
AO-23 Neosho
Repair Ships
AR-1 Medusa
AR-4 Vestal
AR-11 Rigel
Submarine Tender
AS-14 Pelias
Submarine Rescue Ship
ASR-1 Widgeon
Hospital Ship
AH-5 Solace
Cargo Ship
AK-17 Vega (at Honolulu)
Stores Issue Ships
AKS-1 Castor
AKS-3 Antares (entering Pearl Harbor)
Ocean Tugs
AT-13 Ontario
AT-28 Sunnadin
AT-38 Keosanqua (entering Pearl Harbor)
AT-64 Navajo (12 miles outside Pearl Harbor entrance)
Miscellaneous Auxiliaries
AG-16 Utah (Target ship)
AG-31 Argonne
AG-32 Sumner
CM-1 (ex C-3) Baltimore (out of commission)
The following ships were not at Pearl Harbor on 7 December 1941
Aircraft, Battle Force (Task Force 2)
Vice Admiral William
F. "Bill" Halsey
Carrier Division 1
CV-2 Lexington (Lexington
Class)
CAG-21xSBD-2
VB-218xSBD-2
VF-217xF2A-3
VS-218xSBD-2
VT-218xTBD
Carrier Division 2
CV-6 Enterprise (Yorktown
Class)
CAG-61xSBD-2
VB-618xSBD-2
VF-613xF4F-3A, 1xF4F-3
VS-618xSBD-2
VT-618xTBD-1
Scouting Force (Task Force 3)
Vice Admiral Wilson
Brown
Cruiser Division 4
Vice Admiral Wilson
Brown
CA-29 Chicago (Northampton
Class)
CA-33 Portland (Portland
Class)
CA-35 Indianapolis (Portland
Class)
Cruiser Division 5
CA-25 Salt Lake City (Pensacola
Class)
CA-26 Northampton (Northampton
Class)
CA-27 Chester (Northampton
Class)
Cruiser Division 6 (Partial)
CA-34 Astoria (New Orleans
Class)
CA-36 Minneapolis (New Orleans
Class)
Submarines, Scouting Force
Rear Admiral Thomas
Withers, Jr.
SS-211 Gudgeon (Tambor Class)"Joe"
Grenfell
SS-200 Thresher (Tambor Class)Bill
Anderson
AM-30 Seagull (Bird Class)LCDR Danial B. Candler
US Warship Casualties
Sunk, not repaired
Arizona (battleship)
Oklahoma (battleship)
Utah (target ship)
Oklahoma was raised in 1944 and later sold for scrap. She was lost en route to shipbreakers on 17 May 1947. The wrecks of the other two ships still remain at Pearl Harbor but portions of both were salvaged during 1942.
Destroyed but rebuilt
Cassin (destroyer)
Downes (destroyer)
These two destroyers were very badly damaged and were decommissioned after the attack. However, much of their machinery and other items were determined to be salvagable and so were installed in new hulls. These ships carried the same names and hull numbers but they were essentially new construction.
Sunk or beached but later salvaged
West Virginia (battleship)
California (battleship)
Nevada (battleship)
Oglala (mine layer)
Damaged
Tennessee (battleship)
Maryland (battleship)
Pennsylvania (battleship)
Helena (light cruiser)
Honolulu (light cruiser)
Raleigh (light cruiser)
Shaw (destroyer)
Curtiss (seaplane tender)
Vestal (repair ship)
US Army Air Force
HAF (7th AF)
Hickam AB
18th BW (33xB-18 and 12xB-17D assigned;
disposition between units unknown)
-4th RS(H)
-50th RS(H)
-5th BG(H)
-23rd BS(H)
-31st BS(H)
-72nd BS(H)
-11th BG(H)
-26th BS(H)
-42nd BS(H)
58th BS(L)13xA-20A
19th TS2xC-33
Wheeler AB
14th PW
-15th PG2xP-36A, 1xOA-9
-45th PS15xP-36A, 2xB-12, 2xP-40B, 1xBT-2BI
-46th PS21xP-36A, 5xP-40B, 1xAT-12A,
1xBT-2BI, 1xP-26A
-47th PS11xP-40B, 2xP-26B, 2xP-36A, 2xP-40C,
1xB-12
-72nd PS--No aircraft assigned
18th PG2xAT-6, 2xOA-9
-6th PS16xP-40B, 1xP-26A, 1xP-26B
-19th PS15xP-40B, 2xP-40C
-44th PS9xP-40B, 7xP-40C, 2xP-26A, 2xP-26B
-73rd PS13xP-40B, 1xP-26B
-78th PS16xP-40B, 3xP-26A
Bellows AF
86th OS6xO-47B, 2xO-49
Haleiwa AF
US Marine Corps Aircraft
MAG-21
Ewa MCAS
VMF-21111xF4F-3, 1xSNJ-3
VMSB-2317xSB2U-3
VMSB-23219xSBD-1, 3xSBD-2
VMJ-2522xR3D-2, 2xJ2F-4, 1xSBD-1, 1xJO-2,
1xJRS-1, 1xSB2U-3
Midway NAS
VMSB-231 (Det. 1)18xSB2U-3
Wake NAS
VMF-211 (Det. 1)11xF4F-3, 1xF4F-3A****
US Navy Aircraft
Commander, Naval Base Defense Air Force
Pearl Harbor (Ford Island) NAS
VJ-19xJ2F, 9xJRS
VJ-210xJ2F, 2xPBY-1
Puunene (Lahaina Roads) NAS
VJ-34xJRB, 2xBT-1, 1xJRF, 1xJ2F
Commander, Patrol Wings
Kaneohe NAS
VPW-11xOS2U
VP-1112xPBY-5
VP-1212xPBY-5
VP-1412xPBY-5
Pearl Harbor (Ford Island) NAS
VPW-2
VP-211xPBY-3
VP-2214xPBY-3
VP-2312xPBY-5
VP-246xPBY-5
Commander, Aircraft, Battle Force
Pearl Harbor (Ford Island) NAS
CAG-2 (Det. 1)
VB-21xSBD-2
VF-23xF2A-3
CAG-3 (Det. 1)
VF-31xF4F-3
CAG-6 (Det. 1)
VB-61xSBD-2
VF-64xF4F-3A
VS-61xSBD-2
AirBatFor Pool4xF4F-3, 1xF4F-3A,
5xF2A-3
Coast Artillery defense of Pearl Harbor
Permanent Coast Artillery Batteries
A-15 two 16 inch Fort Weaver
B-15 two 12 inch Fort Closson
C-15 two 16 inch Fort Barrette
A-41 four 8 inch Brown's
Camp
B-41 four 8 inch Haleiwa
A-55 four 155mm Fort Kam
Gun Park
B-55 four 155mm Baroes Point
C-55 four 155mm Fort Weaver
A-97 four 3 inch AA Ahua
Point
F-97 four 3 inch AA Battery
Closson
G-97 four 3 inch AA Fort
Weaver
H-97 four 3 inch AA Fort
Barrette
ADDITIONAL NOTES ON AIR LOSSES
Japanese Aircraft Losses
Kido Butai lost 29 planes to all causes over Pearl Harbour. A total of 55 aviators were lost, including those in aircraft that returned to the carriers. An additional 111 planes were damaged of which twenty were later written off.
The planes lost during the actual attack on Pearl Harbor are broken down as follows:
Wave 1: 9 Planes Lost
Akagi: 1
A6M2
Kaga:
2 A6M2, 5 B5N2
Shokaku: 1 D3A
Wave 2: 20 Planes Lost
Akagi: 4 D3A1
Kaga: 2 A6M2,
6 D3A1
Hiryu: 1
A6M2, 2 D3A1
Soryu: 3 A6M2,
2 D3A1
The breakdown of lost or written-off planes is as follows:
The first wave lost 21 aircraft
(3 A6M, 16 B5N and 2 D3A).
The second wave lost 34 aircraft
(6 A6M and 28 D3A).
The aircrew losses were as follows:
Carrier Akagi10 KIA
1st Wave:
Takeshi Hirano
A6M
Shigeharu Sugaya
B5N
2nd Wave:
Hajime Goto
D3A
Kinsuke Homma
D3A
Hirokichi Kinoshita
D3A
Seiichi Ota
D3A
Toshio Oyama
D3A
Kiyoshi Sakamoto
D3A
Chuji Shimakura
D3A
Doshi Utsuki
D3A
Carrier Hiryu5 KIA
2nd Wave
Isamu Kiyomura
D3A
Hajime Murao
D3A
Shigenori Nishikaichi A6M
Yoshio Shimizu
D3A
Korevoshi Sotoyama D3A
Carrier Kaga31 KIA
1st Wave
Toru Haneda
A6M
Syuzo Kitahara
B5N
Kenichi Kumamoto
B5N
Yoshiharu Machimoto B5N
Yoshizo Masuda
B5N
Isamu Matsuda
B5N
Tsuneki Morita
B5N
Izumi Nagai
B5N
Nafikatsu Ohashi
B5N
Toshio Onishi
B5N
Seinoshin Sano
A6M
Yoshio Shimizu
B5N
Mitsumori Suzuki
B5N
Hidemi Takeda
B5N
Tomoharu Takeda
B5N
Yonetaro Ueda
B5N
Nobuo Umezu
B5N
2nd Wave:
Nagaaki Asahi
D3A
Toshiaki Bando
D3A
Ippei Goto
A6M
Fumio Hirshima
D3A
Fukumitsu Imai
D3A
Tomio Inenaga
A6M
Kazuyoshi Kuwabata D3A
Saburo Makino
D3A
Tsuneo Minamizaki
D3A
Iwao Oka
D3A
Shingenori Onikura
D3A
Noboru Sakaguchi
D3A
Sueo Sukida
D3A
Nobuo Tsuda
D3A
Carrier Shokaku2 KIA
1st Wave:
Kunio Iwatsuki
D3A
Tetsusaburo Kumazo D3A
Carrier Soryu7 KIA
2nd Wave:
Shunichi Atsumi
A6M
Fusata Iida
A6M
Saburo Ishii
A6M
Satoru Kawasaki
D3A
Hideyasu Kuwabara D3A
Kenji Maruyama
D3A
Ryochi Takahashi
D3A
These 55 crewmen plus nine men killed and
one captured on the minisubmarines were the only Japanese casualties of
the battle.
U.S. Army Airforce Victory Claims
The U.S. Army Airforce credited the following
pilots with shootdowns:
2nd Lt. Harry W. Brown (1
victory)
2nd Lt. Phillip M. Rasmussen
(1 victory)
1st Lt. Lewis M. Sanders
(1 victory)
2nd Lt. Kenneth M. Taylor
(2 victories)
2nd Lt. George S. Welch (4
victories)
These five pilots were credited with a total of nine Japanese aircraft confirmed downed along with four probables and two damaged.
American Air Strength and Losses
On the 7th of December 1941, there were
7,460 members of the Air Corps (USAAF, USN, USMC), 754 officers and 6,706
enlisted crew, located in Hawaii.
| Location |
|
|
|
|
| Hickam Airbase |
|
|
|
|
| Wheeler Airfield |
|
|
|
|
| Bellows Airfield |
|
|
|
|
|
|
|
|
|
|
As of 7th of December 1941, there were
223 military aircraft based in Hawaii.
| Airplane |
|
|
|
|
| B-17D |
|
|
|
|
| B-18A |
|
|
|
|
| A-20A |
|
|
|
|
| P-40C |
|
|
|
|
| P-40B |
|
|
|
|
| P-36A |
|
|
|
|
| P-26 |
|
|
|
|
|
|
|
|
|
|
Details of Japanese Aerial Deployment
The six Japanese aircraft carriers had a total of 441 aircraft aboard of which 387 were "combat ready" along with 54 spares that were not yet useable, but would become available within a few hours. These 54 were partially disassembled for ease of storage, with each carrier having three spare aircraft of each type aboard. These would be finished shortly before the first wave launched and were used as CAP over the fleet and in the second wave as replacements for lost aircraft of the first wave.
Distribution of the attacking planes.
The figures in the parentheses refer to spare aircraft:
| Carrier |
|
|
|
|
| Akagi |
|
|
|
|
| Kaga |
|
|
|
|
| Soryu |
|
|
|
|
| Hiryu |
|
|
|
|
| Shokaku |
|
|
|
|
| Zuikaku |
|
|
|
|
|
|
|
|
|
|
The Battle-plan
General Concepts
The battle-plan saw the use of 360 aircraft
(81 A6M, 144 B5N and 135 D3A) in two waves (189 in the first wave and 171
in the second wave). CAP over Oahu would be provided by 39 fighters
supported by nine fighters from the first wave. Two reconnaissance
planes launched from cruisers were to scout over Oahu prior to the attack
and report as to the status of the US Fleet. Four additional reconnaissance
planes from cruisers and battleships were to patrol the area between Niihau
and the fleet to protect against surprise encounters with US planes and
ships. So, a total of 405 aircraft were to be involved in the attack.
Of these, ten aborted for various reasons, as detailed below.
Orders and targets of the attack waves
In the memorandum No. 97 the following
orders were given to the air units:
The First Wave
The fighter-bombers and torpedo-bombers
will attack the battleships and then the aircraft carriers. The dive-bombers
should attack ground targets. The aircraft from Shokaku are to attack
the airfield at Ford Island with all its installations, the other aircraft,
Wheeler airfield and its installations. The fighters are to be used as
CAP over the US airfields.
The Second Wave
The fighter-bombers from the Shokaku are
ordered to attack the airfield on Kaneohe and Ford Island. The aircraft
from the Zuikaku are assigned to Hickam Field. The dive-bombers should
attack the aircraft carriers, if the carriers are absent, they should attack
other capital ships. The fighters are to be used as CAP over the
US airfields.
Route of Attack
The decisive strike belonged to the first
wave. The torpedo-bombers should spearhead the attack as they were the
most vulnerable and so needed the moment of surprise the most. The fighters
were ordered to fly CAP and destroy all enemy fighters, on the ground if
possible. The fighters from the Kaga and Akagi were to patrol over Hickham
Field and Barbers Point, the fighters from the Soryu and Hiryu over Wheeler
and Barbers Point and those from Shokaku and Zuikaku over Kaneohe.
The Attack
The First Wave
The first wave had 189 aircraft assigned,
but two A6Ms of the Soryu and Shokaku, one B5N of the Kaga, one D3A of
the Shokaku and two D3As of the Zuikaku did not launch due to technical
problems, so only 183 aircraft reached Oahu.
Fighters
Akagi 9 aircraft in one group
Lt. Cdr. Shigeru Itaya
Kaga 9 aircraft in one group
Lt. Yoshio Shiga
Soryu 9 aircraft in one group
Lt. Masaji Suganami
Hiryu 6 aircraft in two groups of
three Lt. Kiyokuma
Okajima
Shokaku 6 aircraft in two groups
of three Lt. Tadashi Kaneko
Zuikaku 6 aircraft in three groups
of two Lt. Masao Sato
Torpedo-bombers
Akagi 12 aircraft in two groups
of six Lt. Cdr. Shigeharu Murata
Kaga 12 aircraft in two groups of
six Lt. Kauyoshi Kitajima
Soryu 8 aircraft in two groups of
four Lt. Tsuyoshi Nagai
Hiryu 8 aircraft in two groups of
four Lt. Hirata Matsumura
Fighter-bombers
Akagi 15 aircraft in three groups
of five Cdr. Mitsuo Fuchida
Kaga 15 aircraft in three groups
of five Lt. Cdr. Takashi Hashiguchi
Soryu 10 aircraft in two groups
of five Lt. Heijiro Abe
Hiryu 10 aircraft in two groups
of five Lt. Cdr. Tadashi Kusumi
Dive-bombers
Shokaku 27 aircraft
in three groups of nine Lt. Cdr. Kakuichi Takahashi
Zuikaku 27 aircraft
in three groups of nine Lt. Cdr. Akira Sakamoto
The Second Wave
The second wave had 171 aircraft.
One A6M of the Hiryu and one D3A of the Kaga didn't start due to technical
problems and two further D3As failed right after launching and returned
to their carriers (Hiryu and Soryu). So the second wave had only
167 aircraft when it arrived at the meeting-point near Oahu.
Fighters
Akagi 9 aircraft in one group
Lt. Saburo Shindo
Kaga 9 aircraft in one group
Lt. Yasushi Nikaido
Soryu 9 aircraft in one group
Lt. Fusata Iida
Hiryu 6 aircraft in two groups of
three Lt. Sumio Nono
Fighter-bombers
Shokaku 27 aircraft in three groups
of nine Lt. Tatsuo Ichihara
Zuikaku 27 aircraft
in three groups of nine Lt. Cdr. Shigekazu Shimazaki
Dive-bombers
Akagi 18 aircraft in two groups
of nine Lt. Takehiko Chihaya
Kaga 26 aircraft in three groups
of nine Lt. Saburo Makino
Soryu 18 aircraft in two groups
of nine Lt. Cdr. Takashige Egusa
Hiryu 18 aircraft in two groups
of nine Lt. Shun Nakagawa
CAP
A total of 48 fighters provided CAP over
Ohau
Akagi, Kaga, Soryu and Hiryu
each launched their three spare fighters
Hiryu sent three additional
regular fighters
Shokaku and Zuikaku each
sent twelve regular fighters
These were supported by nine
fighters from the first wave
When these fighters ran short on fuel they returned to their carriers, where they were refueled and then returned to Oahu. Three D3As were latter launched to provide navigational support.
Shokaku and Zuikaku used their three spare
fighters to provide CAP over the Japanese Fleet.
Scouts
The cruisers Tone and Chikuma each launched
one Type 0 float seaplane (E13A1 "Jake") at 5:30 am Hawaii time.
These scouted Pearl Harbor and radioed back a report on the status of the
US Fleet shortly before the attack began.
Tone and Chikuma and the battleships Hiei
and Kirishima each launched one scout at 6:30 am Hawaii time. These
patroled the area between Hawaii and the Japanese Fleet.
US Personnel Casualties
Navy
Killed, missing and died of wounds:
2,008
Wounded: 710
Source: Navy Bureau of Medicine
Marines
Killed, missing and died of wounds:
109
Wounded: 69
Source: Marine Corps Headquarters Documents
Army and Army Aircorps
Killed, missing and died of wounds:
218
Wounded: 364
Source: Army Adjutant General Documents
Civilian
Killed, missing and died of wounds:
68
Wounded: 35
Source: University of Hawaii War Records Depository
Totals
Killed: 2,403
Wounded: 1,178
Casualties on USS Arizona BB-39
USS Arizona's total complement on 7 December 1941 appears to have been 1,512, including Adm. Kidd and those who were ashore or on other ships at the time of the attack. On-board that morning were 1,282 officers and enlisted men. Of these, 1,177 were killed, including Adm. Kidd and Capt. Van Valkenburg, leaving 337 survivors all told. A total of 229 bodies were recovered before the Navy decided it was too dangerous to continue, leaving 945 still entombed.
Click
here for a link to an off-site listing of crewmen killed on USS Arizona
Burial on the Arizona
On 7 December 2000, the ashes of Lewis P. Robinson, who was waiting dockside for a Liberty Boat when the Japanese attacked, were placed inside the hull of USS Arizona. Mr. Robinson, who died in 1997, had often told his family that this was his final wish. Mr. Robinson thus became the 16th former crewman to be interred on his old ship, an option available only to former members of the Arizona's crew. As of December 2000, an estimated 50 former crewmen of USS Arizona were still alive.
An estimated 200 other survivors of the battle have had their ashes scattered into the waters of Pearl Habor and an additional unknown number have had their ashes scattered at various other military bases that were attacked on 7 December 1941. As of June 2001, of those US military personnel stationed at Oahu on 7 December 1941, an estimated 8,000 were still alive.
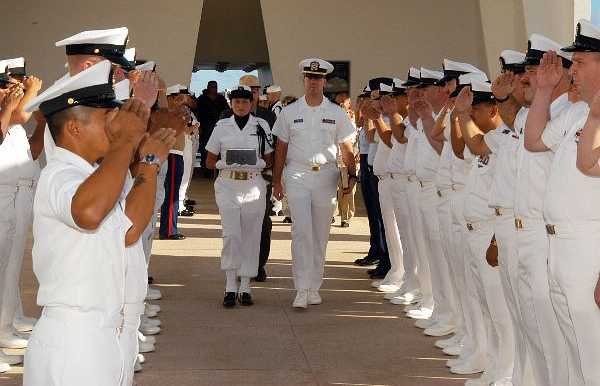
Naval Station Pearl Harbor, Hawaii (30 September 2004)
Chief Petty Officer's assigned to various commands in the Hawaii area, salute as the remains of Chief Machinist's Mate Anthony Francis Czarnecki are taken aboard the USS Arizona Memorial to be entombed. Czarnecki and his brother Stanley both served aboard the battleship USS Arizona (BB-39). Czarnecki and his brother were among 36 sets of brothers assigned to Arizona during the December 7, 1941 attack on Pearl Harbor. Czarnecki's brother was killed in the attack and Czarnecki's last wish was to be returned to USS Arizona to be with his brother and shipmates upon his passing.
U.S. Navy Photograph 040930-N-4995T-001
Sources:
The Attack on Pearl Harbor, An Illustrated
History, Larry Kimmett and Margaret Regis, Navigator Publishing, 1991
The Pearl Harbor Papers, Donald
M. Goldstein and Katherine Dillon (Ed.)
Japanese Cruisers of World War II,
Eric LaCroix and Linton Wells II, N.I.P., 1997
Day of Infamy, Walter Lord
At Dawn We Slept and Pearl Harbor:
The Verdict of History, Gordon W. Prange
Pearl Harbor Attack, Arnold S.
Lott and Robert F. Sumrall, Leeward Publications, 1977
Free State Battlewagon U.S.S. Maryland
(BB-46), Myron J. Smith, Jr., Pictorial Histories Publishing Company,
1986
Golden State Battlewagon U.S.S. California
(BB-44), Myron J. Smith, Jr., Pictorial Histories Publishing Company,
1984
Air Raid, Pearl Harbor! Recollections
of a Day of Infamy, Paul Stillwell, N.I.P., 1981
Cruisers of the U.S. Navy: 1922-1962,
Stefan Terzibaschitsch, N.I.P., 1984
Japanese Warships of World War II,
A.J. Watts, Ian Allan LTD, 1966
Pearl Harbor, HP Willmott
AP news release of 8 December 2000
National Geographic Magazine, June
2001
IJN records, Mark E. Horan and David Aiken (translation of names)
Long Lancers and TROM articles
at Nihon
Kaigun
The Amazing George Welch article
at Planes
and Pilots of World War II
Other Resources
Off-site listing of USN ships in the Pacific not at Pearl Harbor