
|
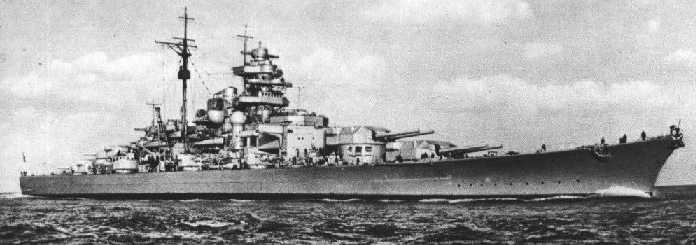
Characteristics of Bismarck |
|
| Standard Displacement | 41,673 tons (42,321 mt) |
| Design Displacement | 45,202 tons (45,928 mt) |
| Full-load Displacement | 49,136 tons (49,924 mt) |
| Battle-load Displacement | 50,129 tons (50,933 mt) |
| Waterline length | 792.48 feet (241.5 m) |
| Waterline beam | 118.11 feet (36 m) |
| Draft (standard)
(design) (full load) (battle load) |
28.54 feet (8.70 m)
30.51 feet (9.30 m) 32.78 feet (9.99 m) 33.37 feet (10.17 m) |
| Depth | 49.21 feet (15 m) |
| Armament | 8-38cm/52 (15") (4x2)
12-15cm/55 (5.9") (6x2) 16-10.5cm/65 (4.1") (8x2) 16-37mm AA (8x2) 8-20mm AA (2x4) |
| Aircraft | Four Arado-196 floatplanes
(plus two in reserve) |
| Speed (normal maximum SHP)
(overload SHP) |
29.0 knots
30.12 knots |
| Propulsive Power | 136,000 SHP (138,000 mhp)
147,900 SHP (150,000 mhp) |
| Endurance | 9,500 nautical miles @ 19 knots |
| Fuel Oil Capacity | 8,267 tons (8,294 mt) |
| Protection - Main Side Belt | 12.60" (320mm) |
| Armor Deck - over Magazines | 3.74" (95mm) |
| Armor Deck - over Machinery | 3.25" (80mm) |
These ships featured a three-shaft propulsion plant which was subdivided into separate engine and fire room complexes by an arrangement of longitudinal and transverse bulkheads similar to that of the Baden and Bayern of World War I. This is why many consider the Bismarck and Tirpitz to be copies of these ships. The propulsion arrangement resulted in a large beam and a relatively substantial GM of 13.41 feet. This large metacentric height, as compared to that of contemporary battleships (Table 2), was a function of the ample stability and low silhouette desired by the Germans.
Fitting a centerline shaft and the requisite sized propellers for the metric horsepower of 150,000 required a much different stem form than was used in World War I German battleship designs. The stem at the centerline had to be configured to give sufficient tip clearance to the large centerline propeller so as to avoid troublesome vibration. This resulted in a loss of underwater lateral area at the stem and a shift of the lateral center of effort forward, which created problems with directional stability.
Locating the rudders midway between the centerline and wing propellers meant that the center to center distance of the rudders was considerably smaller than it would have been in a quadruple-propeller arrangement with the rudders positioned between the propellers on either side. It would appear that the triple-screw arrangement chosen by the German naval constructors resulted in an approximate one-third loss of turning power when compared to a quadruple-screw ship of the same power.
The need to provide clearance
for the centerline propeller also resulted in a longer than usual overhang
in which the weights of the rudders, steering gear and the protective armor
for the steering gear was located. Buoyancy aft was limited by the
smaller immersed volumes that resulted from the cutaway. These characteristics
led to problems in German cruisers and battleships when they were torpedoed
in the stem. Because of the lighter structure and smaller buoyancy
than that found in a quadruple stem form these ships were more prone to
damage from the whipping phenomena which occurs when the extremities of
a ship are subjected to explosion-induced forces. The spectacular
stem failures of the armored cruiser Lützow and heavy cruiser
Prinz
Eugen were examples of this.
|
Metacentric Height (GM) vs. Beam |
||||
| Ship Class |
(tons) |
(feet) |
(feet) |
(feet) |
| Richelieu |
|
|
|
|
| Iowa (1943) |
|
|
|
|
| Yamato |
|
|
|
|
| Vittorio Veneto |
|
|
|
|
| Bismarck |
|
|
|
|
| Anson (1945) |
|
|
|
|
The Germans devoted great attention to the displacement and stability of the Bismarck and Tirpitz. They recognized the need to provide great initial stability, with commensurate resistance to large lists after side compartments were damaged. A disadvantage of this stability was the short rolling period resulting from the large GM. The Bismarck was a lively gun platform and the ship's general behavior at sea was probably rather unpleasant, particularly in following seas, where rolling and yawing motions are coupled. The Bismarck had excessive stability in many respects in that her GM exceeded the "good design practice" standard for GM (at last 5%, but no more than 10%) of the beam. Too much stability results in an unduly "stiff" ship with somewhat unpleasant rolling characteristics which tend to degrade weapon's systems effectiveness.
One of the designers of the Bismarck, Mr. Heinrich Schlüter, was quite unhappy with the protective scheme adopted for these ships. He felt that the lower portion of the side armor belt should have been terminated further below the design waterline than was done in the final design. He confided these concerns to his wife before he left on the fateful voyage that was to take his life. Such a change was impossible to make with the standard displacement already exceeding the limit by 7,600 tons and proposals being made to reduce the displacement.
The German Navy's emphasis on armor protection over gunpower and speed meant that German corporations were in a position to offer the German Navy newly developed armor steels. The Wotan Weich (Ww) and Wotan Harte (Wh) armor steels which were widely used on the armor decks and bulkheads of the Bismarck-class battleships had to be welded with special electrodes. The materials needed to manufacture these electrodes were scarce and even before the outbreak of war they had to be used with great economy. Eventually, a replacement electrode was developed that contained materials found in Germany. These material shortages shed new light upon the decision to suspend the construction of the "H" Class battleships at the onset of hostilities with France and the United Kingdom.
The need to save weight meant
that it was not possible to distribute armor protection evenly along the
hull; it was essential to develop an efficient arrangement which led to
the following important decisions regarding the distribution of the heavy
armor.
Overall, the Bismarck's armored citadel was given good protection against close range shellfire. Unfortunately, the ship was extremely vulnerable to long range plunging shellfire and major positions beyond the citadel were not as well protected as comparable positions on most foreign contemporary battleships.
The Germans were obliged by the terms of the 1935 Anglo-German Naval Treaty to observe the naval treaties signed in 1922 and 1930 as well as any which might be negotiated in the future. When the final design was found to substantially exceed the 35,000 ton standard displacement limit set by the 1936 London Treaty, several alternatives to reduce the displacement to meet Treaty requirements were evaluated. Sufficient reductions could only be accomplished by radical design alterations - modifying the twin main battery turret arrangement to feature either triple or quadruple turrets, altering the main battery to a smaller caliber, changing the split secondary battery to a dual-purpose type, or reducing the thickness and extent of the armor protection.
All of these changes were opposed by the German naval authorities and it was decided to proceed with a ship of 42,000 tons standard displacement and to attempt to deceive the British and Americans regarding their size.2 The draft of these "35,000 ton" ships was therefore officially reported to be only 25' 11" (7.9m). In any event, the Germans were convinced that the Japanese would reject the 1936 London Naval Treaty and thereby invoke an escalator clause, to take effect on 1 April 1937, permitting the construction of 45,000 ton ships.
American and British naval constructors were skeptical of the shallow draft and reported displacement of the Bismarck when she was launched in February 1939.
The fire-control equipment in British warships used direct current and was inferior to the fire-control equipment that was specified for the German ships. The Germans, like the Americans, had decided to use alternating current for their fire-control systems and this contributed to the efficiency of the German gunfire control systems in the engagement fought with the Hood. When the authors interviewed Admiral (then Lcdr.) J.M. Wellings (USN), who was aboard HMS Rodney during the 27 May 1941 action and had been on board Hood in late 1940, he commented that the firecontrol system of the Hood was no better than that he had used aboard USS Florida back in 1927.
When Bismarck was
ready for sea in August 1940, she was recognized by the British as a dangerous
and powerful antagonist. Although the Royal Navy was building five
battleships of the King George V class armed with ten 14-inch/45
guns of a new and powerful model, these ships were acknowledged as being
incapable of defeating either Bismarck or Tirpitz in single
combat. Consequently, the Royal Navy planned to team their capital
ships to fight these powerful new German battleships.
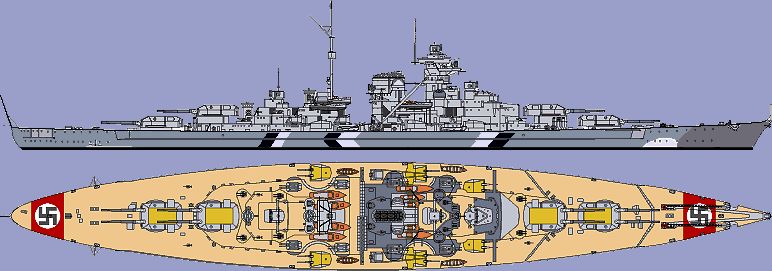
Bismarck as she appeared setting out on "Operation Rheinuburg" except that the swastikas were painted over. Later, in Norway, all of the the hull camouflage except for the false bow wave was also painted over. |

Click on this sketch for a larger image. |
The ambitious plans for a three-month raid into the North Atlantic, commencing in April, were thwarted. Both battlecruisers had to be withdrawn. Gneisenau was damaged by torpedo and bomb attacks, while Scharnhorst needed to have her boilers retubed due to metallurgical problems encountered during her sortie into the Atlantic. When Prinz Eugen was damaged by a mine near Kiel, the operation had to be further delayed until mid-May. These delays to this bold operation in northern latitudes meant the German ships would be operating during much longer daylight periods.
Unknown to the German planners, a number of recent developments increased the risks confronting their surface forces. British search capabilities had been greatly improved by the receipt of Catalina patrol bombers from the United States, the new aircraft carrier Victorious had become operational, improved radar sets were being installed in British warships and aircraft and President Roosevelt had made an agreement with Prime Minister Churchill that the U.S. Navy would patrol the western Atlantic - in fact, he wanted American warships to sink any German surface raider caught in the Caribbean Sea. In addition, the American government had agreed to use its "Neutrality" Air Patrol to search for German surface raiders west of Greenland, which permitted the British to concentrate their war-worn and somewhat depleted search resources to the east. It is very interesting to note that the orders for "Operation Rhine" stated that active intervention by United States forces would prompt changes in the German operation.
Bismarck and Prinz Eugen sortied separately from Gotenhafen (now Gydnia, Poland) on 18 May 1941. They were joined on 19 May by a minesweeping flotilla and three destroyers. After a passage through the Kattegat and Skaggerak, where they had a brief encounter with the Swedish cruiser Gotland, after a brief stop near Bergen, Norway, the battleship and the cruiser left their destroyer escorts behind and steamed into the Norwegian Sea, intent on breaking out into the North Atlantic.
The reasons behind Admiral Lütjens' decision to stopover in southern Norway have never been conclusively established. Based on our decades of research into the Bismarck episode, we now believe there were two compelling reasons which probably led to his decision not to proceed into the Norwegian Sea and rendezvous with the tanker Weissenberg and refuel, as had been planned:
First, the German mission had been compromised by the chance meeting with the Gotland on 20 May, dashing whatever chances the Germans may have had for an undetected passage to the North Sea. Admiral Lütjens was quite concerned about British reaction to his movements. The Admiral was also eager to avail himself of the latest air reconnaissance over Scapa Flow, the main Royal Navy base in the northern United Kingdom. A message from B-Dienst headquarters informed him that Royal Air Force squadrons had been alerted to the presence of a German battlegroup in southern Norway. In fact, one of the displaced squadrons from the carrier Victorious was moved to northern Scotland for possible action against the German ships
Second, weather reports affecting the potential routes for his breakout attempt were delivered to Admiral Lütjens and his staff by a Luftwaffe meteorological officer who boarded the German battleship in Norway With the increasing duration of daylight in the northern latitudes in late May, it was crucial that the weather bc sufficiently overcast to hamper British aerial and surface reconnaissance. The Luftwaffe officer reported favorable conditions for a breakout into the Atlantic provided the German ships moved quickly. A large warm high pressure air mass had become stagnant off the coast of the eastern United States, a classic "Bermuda high" which sent temperatures in cities like New York, Washington and Boston soaring into the 90s. In contrast to this, a large polar air mass was situated over Greenland. These two air masses were in collision over abroad front in the North Atlantic, causing severe icing conditions and turbulence as high as 20,000 feet, with snow, rain showers and fog below the clouds. These were ideal weather conditions for the Germans.
Given the favorable weather conditions and the gathering British air forces in Scotland, Admiral Lütjens almost certainly decided it was urgent that he move promptly and decisively, ordering his forces to head directly for the Denmark Strait, the most distant passage from Scapa Flow. Baron von Müllenheim-Rechberg discussed the weather conditions with fleet meteorologist Heinz Exterbrinck on 22 May. Based or our knowledge of prevailing weather conditions at the time, it is plausible that Exterbrinck too urged Admiral Lütjens to head directly for the Denmark Strait in order to take advantage of conditions favoring an undetected breakout.
When Bismarck and Prinz Eugen arrived in Grimstad Fjord around 1200 on 21 May 1941, the heavy cruiser and the three destroyers were sent to Kalvanes Bay to refuel from the tanker Wallin. By 1930 on that day, after the cruiser and destroyers had taken on maximum fuel Bismarck and Prinz Eugen sortied on their Atlantic mission.
The battleship did not take on any fuel, an inexplicable oversight for an experienced commander such as Admiral Lütjens. Admittedly, the German operational orders, contemplating a rendezvous with the oilier Weissenberg in the Norwegian Sea, did not mandate such port fueling. It is possible that the Wallin lacked sufficient fuel for the battleship or that other circumstances intervened. Part of Bismarck's crew was engaged in painting out her camouflage, an effort that could have prevented the refueling operation. Whatever the reason, the failure to "top off" Bismarck's tanks was to prove to be a crucial omission.
The Royal Navy, although superior to the Germans in numbers, was forced to spread out its forces. Cruiser patrols kept watch over the likely breakout points around the Faeroes Islands and the Denmark Strait between Iceland and Greenland.
Heavy ships, including battleships
King
George V and Prince of Wales and the battlecruiser Hood,
were at Scapa Flow. When Admiral Lütjens left Norway on Wednesday,
21 May, Admiral Tovey deployed his fleet to cover both exit routes, with
Hood
and Prince of Wales assigned to cover the Denmark Strait and King
George V, the old battlecruiser Repulse and aircraft carrier
Victorious
sent to cover the Faeroes exit.
On the morning of 24 May 1941, Hood and Prince of Wales aggressively closed range in classic Royal Navy "Nelsonian" fashion. Hood, a World War One-era battlecruiser with the deficient protection characteristic of the type, was desperately vulnerable to long-range, plunging shell fire. Furthermore, Vice Admiral Lancelot Holland wanted to engage the German force before it could break away and sortie into the North Atlantic. In maneuvering to close the range quickly, Hood and Prince of Wales were forced to head almost directly towards Bismarck thereby simplifying the Germans' gunfire control problem.
In that era, long-range accuracy in deflection was much more readily obtained than accuracy in range. Hood and Prince of Wales presented their full lengths as targets for the German gunners, increasing the likelihood of hits due to salvo dispersion in range. In addition, such a heading masked the after main battery turrets of the British ships, lessening the volume of fire that could be directed at the Germans.
A few minutes after battle was joined, Hood was damaged by 203mm shellfire from Prinz Eugen. Upon reaching a range of 16,500 yards from the German battleship, Admiral Holland ordered a turn to port. This turn was never fully executed by the Hood. Unfortunately for Hood and her crew, Bismarck's third salvo1* was already in the air and the Germans had a perfect gunfire control solution.3 One or more shells from this salvo struck the old battlecruiser in the vicinity of her mainmast. One 380mm shell from this salvo probably struck Hood in her after engine room sending red-hot splinters into the adjacent 4-inch powder magazine. Another shell in the same salvo may have detonated one of the torpedoes in the four fixed tubes which were located on the Upper Deck (USN Main Deck) of Hood. In any case, the 4-inch magazine ignited and almost immediately thereafter, the cordite in "X" 15-inch gun turret ignited causing a deflagration in Turret "Y".4 The armor deck briefly confined the effects of the powder magazine disaster, but the flames finally passed up through the after engine room vents, located near the mainmast.
A fire was already raging in that area, caused by an early 8-inch shell hit from Prinz Eugen which had set ready service lockers for the unrotated projector ("U.P.") antiaircraft rocket launchers ablaze. The spectacular firestorm ripped the old battlecruiser in two, with the two sections sinking within three minutes. Light debris (rivets) from Hood's shell plating rained down on Prince of Wales, almost half a mile away. Heavier structures, such as "X" turret, were blown overboard. Pipes from within the side protective system floated to the surface. It was an alarming and depressing scene to those on the other British ships in pursuit.
The destruction of Hood's main subdivision bulkheads between the three magazines and the after engine room at a point where there was a reduction in the depth of the hull girder resulted in an instant, calamitous reduction in the structural strength of the hull. Hood was reportedly heeling some 6-7 degrees to starboard, and then quickly began capsizing to port as her hull was torn apart. It is likely that secondary explosions occurred as the ship sank, such as when the hot boilers contacted the 48-degree seawater. Such collateral damage would greatly complicate any future analysis of the Hood wreck by a Ballard-like expedition. Available evidence leads us to believe that the battlecruiser broke apart near the "step-down" in her hull, just forward of "X" turret.
This tragedy was witnessed by very few of those on board Prince of Wales. The deflagration of the 112 tons or so of cordite in the after magazines was noted as a "quiet, crackling noise," as in a rapid powder burn, quite unlike the loud "crack" or "clap of thunder" associated with an explosion.5 Understandably, many of the men who viewed the Hood's destruction from Prince of Wales were distracted by the calamity. The crew of the forward secondary battery gunfire control director, for example, was very slow in engaging Prinz Eugen with 5.25-inch fire until their ship was struck by a shell from Bismarck.
Prince of Wales subsequently became the sole target of accurate and concentrated fire from the two German ships. Prince of Wales had concentrated her fire on Bismarck throughout the engagement, with Hood targeting Prinz Eugen. Once the British had closed range to about 26,000 yards, the Type 284 gunnery radar aboard Prince of Wales was used to check the accuracy of the ranges being obtained using the main battery coincidence-type optical rangefinders.2* This permitted Prince of Wales to hit Bismarck with her sixth salvo, before she received seven hits and suffered multiple mechanical failures of her 14-inch guns which forced her to turn away from the Germans.6 The British battleship had fired a total of seventeen salvos, all involving five guns or less. One gun in Prince of Wales' "A" turret had problems with its rammer and could no longer fire after the first salvo. Her "Y" turret jammed and was out of action for approximately one hour. As Prince of Wales turned away, she was struck underwater by a diving 380mm shell which fortunately did not explode. We are convinced that it was Prince of Wales, not Hood, which damaged Bismarck. Hood fired at Prinz Eugen throughout the engagement. Although Hood did signal for Prince of Wales to shift targets, her own fire control equipment was too antiquated to permit her to change targets herself.
The destruction of Hood was a stunning German victory, but not without its price. The German battleship had been hit by three 14-inch shells from Prince of Wales. One 14-inch shell hit aft of the stack and demolished the stern of the captain's motor launch. Another 14-inch shell fell short, causing serious damage after following an underwater trajectory and hitting Bismarck below the waterline. The third shell penetrated the 60-mm splinter belt in the bow, above the normal waterline but within the bow wave generated by high speed steaming.
The first shell caused negligible structural damage. The second shell struck the port side of Bismarck somewhere below the 320-mm main side belt in compartment XIV (in way of the fore bridge tower). This shell defeated the side protective system and exploded against the 45mm torpedo bulkhead. Fragments from the explosion penetrated the bounding bulkhead of the portside cable ways and the main transverse bulkhead between the forward port turbo-generator compartment and the port boiler room. The turbo-generator room quickly filled with water. The boiler room flooded at a much slower rate through tears in welded seams in the main subdivision bulkhead. These leaks were controlled by plugging the torn welds with canvas hammocks.7 The eventual loss of power from two boilers in the port boiler room reduced the battleship's maximum speed to 28 knots, still marginally better than that of the pursuing British ships.
The third 14-inch shell, which passed through the 60mm splinter belt well forward on the port bow and above the armor deck, dramatically changed the course of the Bismarck's mission. Compartments XX and XXI in the bow were totally flooded with a mixture of oil and seawater. As the manifolds for the fuel distribution system were located in one of the flooded compartments, Bismarck was suddenly deprived of the use of more than 1,000 tons of fuel oil. The shell passed completely through Bismarck without exploding, but the holes it left were some 850mm in diameter and below the bow wave with the ship trimmed down by the bow. After voids were counterflooded aft, these holes were covered with sail cloth. We could not detect either of these shell holes in the photography brought back by Dr. Ballard in 1989 because Bismarck is imbedded in sediments up to her design waterline.
Bismarck took a 9-degree port list and a trim down by the bow of 2 meters. The loss of more than 1,000 tons of fuel was by far the most critical consequence of this battle damage. Fuel tanks had been contaminated by sea water, and the fuel distribution system forward had been seriously damaged. The access trunks to the manifolds in this area were also flooded.
Although the Germans were
able to localize the damage caused by the two underwater shell hits, flooding
in the affected compartments was permanent and had to be countered by flooding
port voids aft in the area of the steering gear rooms to reduce trim and
list.
At dusk, a torpedo attack was made by Swordfish biplane torpedo bombers from Victorious, which had drawn to within 200 miles of Bismarck's position during the early evening of 24 May. The torpedo planes made their attacks, but were only able to make one hit. The torpedo struck the 320-mm main armor belt on the starboard side between the forward command tower and the funnel. The shock effect of this explosion was substantial, throwing one crew member against the superstructure, killing him, and severely injuring six men in the forward starboard turbo-generator room (Compartment XIV) inboard of the point of torpedo detonation.8
The torpedo detonation also displaced emergency damage control shoring and hammock patches in the welds, and weakened already damaged structure on the port side. This resulted in the complete flooding of a forward boiler room on the port side. The considerable shock effect from the firing of the 37mm and 105mm guns contributed to loosening the shoring. The loss of the boiler room had been anticipated, as progressive flooding had never been completely arrested, and two boilers had already been secured, reducing Bismarck's speed. In addition, the zig-zagging and violent turns made to avoid torpedoes tore away the sail cloth over the two shell holes in the bow. This caused continued flooding at an increased rate due to ship speed and the deeper caused by counterflooding.
Bismarck continued on a course south to southwest until 0300 on 25 May, when she made a long gradual turn to starboard and maneuvered some distance behind her zig-zagging British pursuers on a course towards Cape Finnestere, France. The Germans were unaware they had managed to break contact.
The Germans had been both impressed and depressed by the unexpected efficiency of the British radar. The Germans continued to receive British radar transmissions, although the receivers on the Royal Navy ships were too far away to receive the returning echoes from the Bismarck. As a result, not suspecting he had broken away from his pursuers, the Admiral sent a very long (over 30 minutes) situation report radio message describing the actions of 24 May and the resulting damage.
The German radio transmission was intercepted by British radio-direction finding stations. Admiral John Tovey requested that the resulting lines of bearing be sent to King George V, where they were mistakenly plotted on a Mercator chart, rather than the gnomonic chart which was required to plot such lines of bearing correctly. Consequently, for seven hours thereafter the British ships under Tovey's command steamed away from Bismarck instead of toward her! After the computations were re-examined late in the afternoon, Admiral Tovey realized that a mistake had been made, and, after consultation with the Admiralty, finally let himself be persuaded to follow a course to the east. After seven hours of heading in the wrong direction, the British fleet turned to the southeast, the direction in which Bismarck had always been heading. Rodney, an older and much slower ship, had maintained a steady course to the east and was now only slightly astern of Bismarck, although gradually losing distance.
The stormy, overcast weather helped in this turn of events. Winds of force 9 and dense cloud cover aided the Germans in their escape, but their course was downwind and following seas caused a large yaw response and significant rolling. During trials in the Baltic, Bismarck had demonstrated problems with directional instability, which was corrected by using the rudders. The combing effects of the storm, the following seas and this slight directional instability, necessitated substantial rudder usage to maintain the desired course.
Lütjens decided to limit Bismarck's speed to 20 knots to conserve fuel. Contrary to what has been established about the fuel situation on Bismarck, she was never in danger of actually running out of fuel. The Germans, however, were concerned about the effects of excessive fuel consumption that might result if she were forced into an engagement with a British battlegroup before she could gain the protective cover of Luftwaffe aircraft based in occupied France.
The near-calamitous erroneous
plotting of Bismarck's position had ensured her escape unless the
British could somehow slow Bismarck to permit the pursuing, slower
Royal Navy ships to overtake her. The British had one chance for
this . . .
2 It is instructive to note that all navies exceeded these "Treaty" constraints. The Royal Navy came closest to full compliance and their ships of the King George V class were consequently amongst the weakest of all the Treaty Battleships. Forced to comply with a near-impossible combination of design constraints on beam, draft and sheer, as well as 14-inch gun armament, the designers came up with ships which were well-armored, but suffered from inefficient propulsive machinery and a deficient torpedo defense system. The latter was marginally improved in Anson, Howe, King George V, Duke of York and Vanguard later in the war, incorporating lessons learned from the loss of Prince of Wales in the South China Sea (Refs. 6, 7, 8 and 9).
3 This information was gleaned by the authors from Paul Rudek whose station was in Bismarck's main battery fire control.
4 The possible causes of the explosion of the 15-inch gun magazine vary. Either shell splinters passed through the bounding bulkhead from the adjacent 4-inch gun magazine or the heat of the 4-inch gun magazine caused the ignition of the cordite in the main battery magazines. A deflagration is a fire which burns violently with intense heat, giving off sparks, a near explosion.
5 Captain Colin McMullen, at the time the Gunnery Officer on Prince of Wales, noted to us that he could not remember any noise associated with the destruction of Hood. He noted that he was wearing headphones and that there was a slight wind blowing by his position, but that he was certain he would have heard the noise of a loud explosion so near to his own ship. In many respects, the incident was comparable to the tragedy in Turret II of USS Iowa on 19 April, 1989.
6 Winston Churchill was furious at this incident, exclaiming that "British battleships do not turn away from the enemy." This was an unfair indictment, for Prince of Wales was a brand-new ship with a partially-trained crew and unreliable main battery turrets.
7This evidence was provided by seaman Josef Statz, whose battle position was in Damage Control Central.
8Although very few of the slide images obtained by Dr. Ballard's team showed vertical surfaces, and almost none of these showed the hull, by chance one view showed evidence of this torpedo hit. The top edge of the main armor belt is shown, and the joint between two plates shows a displacement of a couple of inches, indicating the inboard displacement of one armor plate caused by the effects of the detonation of the torpedo warhead against it.
The following notes are by T. DiGiulian, editor and transcriber for the electronic version of this article.
1*This is possibly a differing interpretation of the "bracket-salvo" firing technique used by the Germans. The Bismarck fired three half-salvos (four guns) to find the range - the third one straddling - and then fired three more half-salvos at the Hood. The fifth half-salvo struck and exploded the Hood, the sixth half-salvo was fired just before the fifth half-salvo struck. These six half-salvos may be interpreted by the authors as being three full-salvos (eight guns).
2* Whether or not radar was used by the Prince of Wales during this engagement is an unresolved subject. It is not supported by Capt. S.W. Roskill, R.N., in his semi-official history "War at Sea" which says, "In the Prince of Wales no results were obtained from either of her two [radar] sets [types 281 and 284] throughout the action." This is apparently taken from "Gunnery Appendix to Narrative of Operations Against Bismarck," page 193 of ADM234/509. From the account given by the Prince of Wales' Radar Officer, Sub-Lieutenant Stuart E. Paddon, RCNVR, this failure appears to have been an organizational rather than a technical problem. In his article, "HMS Prince of Wales - radar officer", published in Salty Dips, Vol. 1 (NOAC, Ottawa, 1983) he states:
"My position was in the 281 receiving office and I personally manned the display tube. In those days we had no gyro repeats; we had to give the bearings by red or green [port or starboard], but we did have two M-type transmission units, little counter-drums on which we could transmit range. The transmission counter-drum that I controlled had as its counterpart a receiver on the bulkhead of the Transmitting Station - the TS. This had to be read and placed by someone into the calculations which were being carried out on the plot. Unfortunately, despite the fact that I transmitted these ranges, no one even knew they were coming in on the counter-drum and no radar ranges were used by our gunnery people. We had only one previous shoot and had not developed any drill."It is possible that radar ranges were used for gunnery during Prince of Wales' second engagement with Bismarck and that the two incidents were confused in the memories of the participants.