
Fifteen Swordfish planes took part and two torpedo hits were made. One struck abreast of the aft superstructure adjacent to Compartments VII and VIII. Slow flooding followed, caused by tears in welded joints and longitudinals and structural failures in transverse bulkheads. This damage was inconsequential compared to the effects of the second torpedo, which effectively doomed the ship.
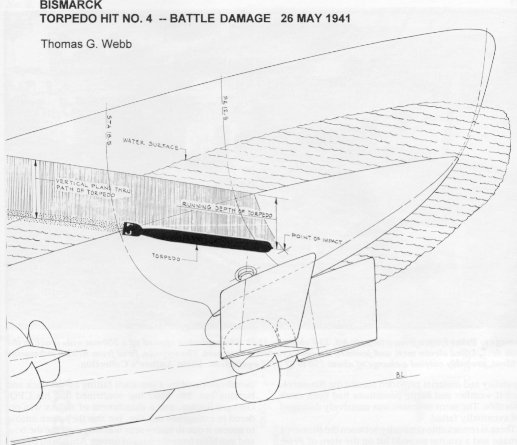
The fatal torpedo hit the
steering area of Bismarck. The full fury of the detonation
was vented into the ship and against the shell and rudders. The steering
capability of the ship was destroyed. The transient whipping response
caused by this torpedo hit was stunning. The hull, according to survivors,
acted like a springboard, and severe structural damage was sustained in
the stern structure. The steering gear complex, encased in 150mm
thick armor, was rather rigid in comparison to the 10 meter long canoe-shaped
stern. The unarmored stern structure vibrated at a different frequency
than the main hull just ahead of it. Tears were opened in the side
shell and bulkheads adjacent to the damaged area. The two decks in
the stern were wrecked by the force of the explosion, and equipment in
the fantail area was seriously damaged as the gasjet expanded upward.
Seaman Helmut Behnke, who was sent to check on the fog-making machinery
and its piping found it completely destroyed. Evidence of the severity
of damage can be seen in the videotapes of the stern area of the wreck.
The remaining platform decks are badly twisted and the upper portions of
the damage can be barely seen just above the sediments.
 |
The rudders were jammed at a position of 12 degrees to port, as the ship was in the process of turning to evade a portside torpedo attack when she was struck. Herculean efforts by the damage control teams could not correct this situation as they were unable to enter the steering compartments. Immediately after the torpedo hit Bismarck commenced turning in circles, out of control. Once speed was reduced, the ship inexorably assumed a course to the northwest, directly towards her pursuers, as the intensity of the storm increased.
Attempts to vary the propeller rpms on the three shafts, ordered by the leader of the damage control team, Commander Hans Oels, failed to counter the effects of the jammed rudder. With British destroyers now closing to attempt torpedo attacks, Bismarck began a night gunfire action which prevented any further damage-control efforts aft. Stormy conditions, darkness, and gun blast from turrets Caesar and Dora prevented damage control teams from assembling at the stern to try to access the steering gear compartments and repair the damage. Divers reported to Commander Oels, the Executive Officer, that they were unable to enter because of surging water within the after steering gear rooms. One of the divers had to abandon his attempt after his air hose became ensnared in damaged structure, cutting off his air supply. Josef Statz overheard Commander Oels say to the exhausted divers when they entered Damage Control Center: "Only if we had the diving apparatus issued to submariners."
We believe that part of the stern collapsed onto the rudders, as happened with the Prinz Eugen and armored cruiser Lützow, or was damaged in such a way that it was impossible to steer the ship by either manual or mechanical means. It would have been necessary to cut away structure which was covered by surging water. In any event, the repair of such damage was beyond the capability and material provided aboard the Bismarck, even if weather and battle conditions had been more favorable. The stern structure was massively damaged and eventually failed.
There is remarkable similarity
between the Bismarck damage and a similar torpedo hit on the stern
of Prinz Eugen on 23 February 1942. Dr. Erwin Strohbusch, who directed
the repairs of this heavy cruiser in Norway, wrote to us that this incident,
and an earlier one on the armored cruiser Lützow, whose stern
also collapsed from a torpedo hit, indicated a structural flaw in the stern
design of German armored ships, heavy cruisers, battleships, and battlecruisers.
Improvements were made to the stern structures of Admiral Hipper,
Lützow,
Tirpitz,
Admiral
Scheer and Scharnhorst during 1942-1943.
According to the recollections of Baron von Müllenheim-Rechberg and Mr. Statz, these destroyers achieved no torpedo hits. We did find evidence, however, of a fire on the starboard bow of Bismarck, presumably caused by a star shell falling on the deck and burning out. Mr. Statz has confirmed that his CPO, Gerhard Sagner and a detachment of sailors was ordered to extinguish this fire, but that they were unable to access it due to heavy seas washing over the bow and gun blast from the guns of turrets Anton and Bruno. Eventually, heavy seas washing over the bow put out the fire. This star-shell fire was reported as a definite torpedo hit by the British destroyer Maori.
On the morning of 27 May 1941 Bismarck was surrounded by British forces consisting of battleships King George V (ten 14-inch guns) and Rodney (nine 16-inch guns), battlecruiser Renown (six 15-inch guns), aircraft carrier Ark Royal, heavy cruisers Norfolk and Dorsetshire (each with eight 8-inch guns), cruiser Sheffield and nine destroyers.
Admiral Tovey's strategy
was to quickly close Bismarck from her port bow with King George
V and Rodney. Renown, with her light protection,
was ordered to accompany Ark Royal and remain well clear of the
scene of the gunnery engagement. Renown was to be used only
if the primary force sustained incapacitating damage. The battle
began at 0847, commencing at a range of 20,000 meters, with the British
ships firing first. Below is a British track chart of the action.
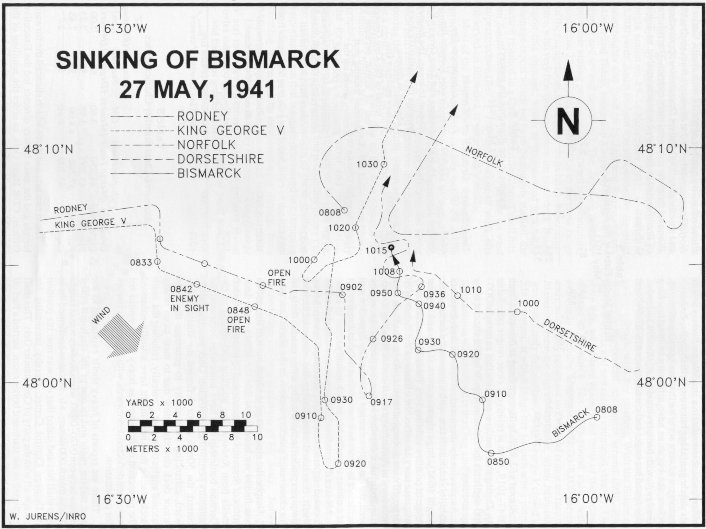
Please click on this plot for a larger image. |
Bismarck, unable to
steer, was at the mercy of the gale-force storm. To fire guns from
a platform that had unpredictable ship motions created a difficult gunnery
problem, but Adalbert Schneider, Bismarck's gunnery officer, was
able to obtain a straddle on Rodney before his ship began taking
hits from British shells. Rodney's gunnery was very accurate
in these opening moments, before she began to have difficulty in ranging.
King
George V, with her more modern equipment and radar, also found her
target early and between 0920-0924 hit Bismarck with a number of
her 14-inch shells. Cruiser Norfolk concurrently fired at
Bismarck
from starboard and shortly after 0900 cruiser Dorsetshire approached
Bismarck
from the starboard stern quarter. The volume of fire directed at
Bismarck
was remarkable, as Table 3 shows:
|
British Shells Fired at the Bismarck 27 May 1941 |
|||||
|
|
|
|
|
|
|
| King George V |
|
|
|
|
|
| Rodney |
|
|
|
|
|
| Dorsetshire |
|
|
|
|
|
| Norfolk |
|
|
|
|
|
A total of 2,876 shells were
fired at Bismarck from 0847-1019, most at relatively close ranges
(see Table 4). During that time, it is possible that as many as 300-400
shells hit the German ship. Why did she not blow up and sink?
|
Ranges to the Bismarck (in meters) 27 May 1941 |
|||
|
|
|
|
|
|
|
|
|
Rodney commences to fire. |
|
|
|
|
King George V opens fire. |
|
|
|
|
Rodney and King George V close at 16 knots. The Rodney does not fire until 0918 due to a change in course. |
|
|
|
|
Rodney resumes fire. |
|
|
|
|
"A" turret of King George V out of action because of jammed training gear. |
|
|
|
|
Rodney closes on Bismarck's port side. |
|
|
|
|
Seaman Josef Statz appears on the bridge of the Bismarck. |
|
|
|
|
King George V resumes fire from all her turrets. |
|
|
|
|
Rodney approaches on the Bismarck's starboard quarter. |
|
|
|
|
Rodney continues salvo fire, scoring repeated hits. |
|
|
|
|
Rodney ceases fire. |
|
|
|
|
King George V ceases fire. |
As previously discussed,
Bismarck
had excellent stability characteristics, with a substantial metacentric
height (GM), large righting arms (GZ) and a great range of positive stability
(see Table 5). Such stability was necessary to offset the effects
of the flooding of large off-center compartments. As a result, it
was necessary to cause massive off-center flooding to capsize and sink
a Bismarck-class battleship. As will be seen, the extensive
damage sustained by Bismarck was sufficient to overwhelm and defeat
the ship, but was not of a nature to cause her to sink quickly.
|
Bismarck-Class Stability Characteristics |
||||
| Condition |
(Metric Tons) |
(Meters) |
(Degrees) |
(Righting Arm) (Meters) |
| Light Ship |
|
|
|
|
| Standard |
|
|
|
|
| Full Load |
|
|
|
|
| Capacity |
|
|
|
|
Most of the gunfire damage was concentrated on the forward superstructure and command tower. Many shells ricocheted after hitting the water surface or simply exploded in the sea. The armor citadel, designed for close-range gunnery actions in the North Sea, prevailed.
Despite the close range at which most of this action was fought we have found that the 50mm main deck armor of Bismarck was penetrated by two of the 16-inch shells from Rodney. The pitching and rolling of the German battleship may have somewhat decreased the obliquity permitting penetration. Once penetration occurred, the 50mm armor deflected the shells downward, enhancing their ability to penetrate the main armor deck directly below due to their more nearly normal angles of impact. Ironically, reducing the main deck plating thickness might have actually enhanced the protection of Bismarck as heavy shells would not have been deflected downwards, with improved chances for penetration.
There are reports of heavy shells exploding in the port turbine room and in one of the starboard boiler rooms between 0920-0930, when Rodney was at ranges of less than 9,000 meters. Mr. Statz has confirmed these two shell hits and stated that one was near his position in Damage Control Center, thereby preventing his escape aft with the party of Commander Oels. This shell exploded in the starboard boiler room, started a fuel oil fire and burst steam pipes. Superheated steam scalded a number of ratings who had survived the shell burst.
These two hits and those which silenced the forward turrets and the main battery director led the Executive Officer, CDR Hans Oels, to order the scuttling of the ship (Measure V, where V = "Versenken" = Scuttling) between 0920-0930.
One American battle damage experience in World War II, very similar to the Bismarck situation, aided our analysis. The American battleship USS South Dakota, with a profile generally similar to that of Bismarck, was engaged by Japanese forces off Guadalcanal during a night action on 13-14 November 1942. At a range of 5,800 yards, South Dakota was silhouetted by Japanese searchlights and fired on by Japanese heavy cruisers Atago and Takao (each with ten 8-inch guns), battleship Kirishima (eight 14-inch guns) and several destroyers. The Japanese gunners' probable aiming point was the forward superstructure and some 27 shells hit the ship. Due to the close range of the engagement, most of the shells hit the superstructure, with very few striking below the main deck. Based upon this damage, which is documented in a battle damage report which we have thoroughly studied, the action resulted in a Gaussian distribution of shell hits on South Dakota with a peak located at her forward superstructure. The distribution of shell hits observed on Bismarck is surprisingly similar.
Most of the British shells struck the forward superstructure of Bismarck with the hits late in the action simply rearranging the debris created by earlier shell hits. A few shells struck and penetrated the 350mm conning tower, the upper splinter belt and the lower side belt. However, based upon the distribution of hits during the South Dakota action, which also took place at a close range, we believe that there must have been numerous serious shell hits in the area between the Admiral's bridge and the stack. We know from photographic evidence that there was an internal explosion in the forward port 150-mm turret and its magazine, probably caused by either 16-inch or 14-inch shells. Again, the historical record and probability theory can be used to determine the origin of these shells. One important point that we have discovered in examining the video of the port and starboard sides of the forward conning tower is that the penetrating damage from 356mm and 406mm shell hits was all on the port side.
Investigation of the gunnery records of King George V and interviews with several of her officers reveal that there were problems with the mechanical safety interlocks designed to prevent explosions within the turrets from being transmitted to the powder magazines below. Her gunnery during the battle averaged 60% between 0920-0950, with only the twin turret performing at 100% effectiveness. Rodney, however, kept up a steady barrage, with few misfires. With the failure of Rodney's fire-control equipment around 0930, Bismarck was tracked and ranges estimated visually. Despite this, we believe Rodney did most of the serious damage to Bismarck. Her 2,048-pound shells were extremely effective at ranges of 2,500-8,000 meters and could easily penetrate any vertical armor surface of Bismarck. Near the end of the battle, when Bismarck was completely defenseless, King George V closed to 3,000 meters, at which range her 14-inch armor piercing shells could penetrate all of Bismarck's vertical armor.10
All the guns aboard Bismarck used cartridge-type powder cases. The Germans believed cartridge-type ammunition was much safer than bag ammunition and decidedly less susceptible to magazine explosions such as those which devastated several British battle cruisers at Jutland. There were, however, magazine fires in Gneisenau in February 1942 and Bismarck's sister ship Tirpitz on 12 November 1944 which were caused by red-hot splinters from bomb hits which ignited some cartridges. In Gneisenau, turret Anton was uplifted a few feet before magazine flooding put out the deflagration.11 In Tirpitz, turret Caesar was actually blown overboard.3*
In the case of Bismarck, we believe that the magazines of turrets Anton, Bruno and Dora were flooded and no magazine deflagrations occurred. Turret Bruno was displaced upward slightly by an internal explosion which did not reach the magazines but was sufficient to blow off the rear armor plate. Thereafter, the turret was pitched forward in its barbette. This all has been confirmed from survivor testimony of Mr. Statz.
Most of the damage done by Dorsetshire and Norfolk was relatively superficial. A hit from Norfolk sheared away the forward radar and gun director atop the forward command tower and other shells damaged a number of 37mm and 105mm gun mounts along the starboard side. According to our interviews of Baron von Müllenheim-Rechburg and Mr. Josef Statz, the gunfire of Dorsetshire was devastatingly accurate, smashing gun mounts, gouging into armor, ripping away light plating and sweeping away debris left by hits from the battleships. In many cases, damage came from multiple hits causing debris to be swept overboard or piled in large heaps along the port side from the amidships catapult to turret Bruno. Baron von Müllenheim-Rechberg and Mr. Statz have told us that the two after main battery turrets sustained gouges several centimeters deep in their armor surfaces. The evidence regarding the final condition of these turrets is limited because they were buried in the seabed after the ship capsized on sinking.
Our examination of the wreck of Bismarck does not permit us to conclusively determine exactly when the battered stern end fell away - it had almost certainly failed structurally during the capsizing process. Prior to the capsizing, the stern no longer contributed any buoyancy to the stability and survivability of the battleship. We do know from the testimony of Mr. Statz that Bismarck's stern was in place when he was carried past it by the prevailing seas around 1035. Mr. Statz was within 50 meters of the ship when she capsized and sank. There is the possibility that as the ship sank and righted herself, the hydrodynamic forces caused the stern to fail completely underwater.
We attribute the structural fatigue-type failures in the stern to poor welding, a structural continuity problem resulting from the design mistake of not extending the longitudinal bulkheads bounding the Steering Gear Room aft into the stern-end structure and gunfire damage to the plating just aft of the transverse armored bulkhead to the steering compartments. The structural design deficiency was later recognized in Bismarck's sister ship Tirpitz and the longitudinal bulkheads were extended into the stern during repairs in Norway. In fairness, it must be noted that welding was a new technology in ship construction in the 1930s and that other German and foreign warships also experienced cracks in welded joints after sustaining damage. There is also evidence that welding failures occurred in the torpedo bulkhead in Compartment VII where it was necessary for damage-control teams to insert hammocks in the cracks of the welded joints.
Remarkable evidence of the
failure in the heat affected zone of the welded seam at Bismarck's
stern was observed on the seabed in 1989. A large piece of plate
from the port side shell just aft of the Steering Gear Room was found in
the debris field. We could absolutely identify this plate by a unique
row of portholes and a straight edge, which gave clear evidence of structural
failure in the welded joint. One jagged end had a large hole, which
we believe resulted from a 16-inch shell hit. The authors were aware
of the severity of the damage in the stern end from 1983 correspondence
with Wilhelm Schmidt, who was the leader of the damage control team aft
and from testimony of British observers aboard Rodney.
As a practical matter, Bismarck was vulnerable to penetration by British heavy caliber shellfire throughout almost all of the final engagement. Most of the battle was fought at very close ranges and the resultant flat trajectory fire was very likely to ricochet off the surface of the water. This prevented many hits on Bismarck's underwater hull as shells falling short would probably ricochet and careen into the upper hull or superstructure instead of penetrating the surface. Many shells ricocheted off the 50mm main deck armor and there were a few penetrations of the deck armor. According to Seaman Paul Rudek, who escaped from the Forward Main Battery Plotting Station in Compartment XV, the scene between the upper and lower armor decks was indescribable. He and his chief petty officer made their way to the main deck and escaped from Bismarck from her starboard side. Hatches and doors between these decks had become jammed due to distortion and heavy wreckage which lay in the way.
We did find evidence of penetration of the upper side belt on the port side in way of the forward superstructure and stack. There were at least four shell holes in this 145mm belt clustered around Turret 64. The starboard side upper belt armor could be examined for only a limited distance aft of Turret 65 where a few gouges were noted. This was the side of the Bismarck that was primarily engaged by heavy cruisers Norfolk and Dorsetshire.12
Almost all the German survivors came from battle stations below the armor deck or from a few fortunate locales that were not hit, such as Baron von Müllenheim-Rechberg's after director station, which had enough armor to initiate heavy caliber shell fuze action, but not enough to keep such shells from penetrating.
We have examined the available
evidence for a Bismarck battle-damage analysis (Refs 12, 13, 14,
15, 16 and 17). An overall view of the Bismarck around the
time of her sinking is presented in Part 3 of this article. A tabulation
of the more important hits follows:
B. All three anchors and their chains are missing. Part of the starboard chain remains, tucked into an oblong hole in the Main Deck forward of the starboard anchor windlass. This hole is approximately 2-3 meters long and half a meter in width. The teak deck around the hole is missing and charred. We believe this hit came between 0945-1000, when Rodney was off Bismarck's starboard quarter. Such a hit may have started a fire in the berthing spaces below.13
C. A shell (possibly 14-inch, according to the King George V gunnery report) hit near the top of the barbette of turret Bruno and tore away a large piece of 340mm armor some 700mm along the circumference. At the aft port quadrant of the barbette there is a large hole where the Main Deck plating was ripped away from the barbette. Mr. Statz states that he was able to look into Turret Bruno, as this turret's rear wall had been blown away. The turret was also pitched forward on its barbette, indicating an internal explosion. Survivor reports indicated that Turret Anton also showed evidence of an internal explosion, but this cannot be confirmed.
D. Oblique video views indicate that the after port side of the forward conning tower was hit repeatedly. As many as 25 shell and fragment holes are apparent in the field of vision. There was a large hole punched into the 350-mm armor plate on the portside by several 14-inch shells from King George V before she ceased fire around 1014. The number of penetrating hits, as opposed to surface-marring fragment splashes on the armor, cannot be conclusively determined, due to shadow effects and the oblique angles of view. Mr. Statz, who viewed this damage from both the outside and inside, has indicated that the port side of the conning tower looked like "swiss cheese." The heavy armored door on the port side of the conning tower is missing from its frame and massive hinges and is lying on the deck of the wrecked bridge structure nearby. This slab of armor may have somehow been entangled in adjacent damaged structure, finally coming to rest in an opening to an inclined ladder just aft of this position. The presence of this door suggests that the capsizing of Bismarck may have been limited to less than 90 degrees. Penetration of the 350-mm vertical armor of the conning tower armor was possible by Rodney and King George V, especially during the later stages of the action when the Bismarck was, to all intents and purposes, defenseless.
E. The forward superstructure was ravaged by shell hits from the main and secondary batteries of the two British battleships. These hits tore away superstructure plating and stiffeners, as well as the louvers for the forward boiler intakes. Several of the latter were found in the debris field. These hits undermined the support for the forward bridge tower (command tower), which collapsed and broke away from the hull at the level of the lower bridge deck (USN 02 Level) when the ship capsized. Remarkably, the Admiral's bridge sustained very minor damage, the only level of the forward superstructure not devastated by shell hits.
F. The 105mm gun turrets on the port side forward were heavily damaged and unrecognizable. All that remains from the second 105mm turret on the port side - Turret 44 - is a plate from its undercarriage. Mr. Statz confirmed this from his own observations aboard Bismarck that fateful May morning.
G. The forward 15cm turret (Turret 62) on the port side was wrecked by British shellfire and was covered by debris from the forward superstructure and parts of the port aircraft/boat crane before Bismarck capsized. The after section of the 80mm armored roof is missing, presumably removed by an ammunition explosion within the turret. The right side 80mm armor plate has been riddled by shell hits and fragments. With a large number of holes in the side armor and the after roof missing, the interior of the gunhouse is visible. Turret 62 is trained well aft, with its guns pointing towards Bismarck's port quarter. Survivors reported a severe fire in this turret's magazine and Mr. Statz was personally ordered by his superior, Chief Petty Officer Gerhard Sagner, to flood its magazines, which would have contributed to the port list. The side of this turret is much darker than the surrounding structure. This is a consequence of a severe fire that raged inside and outside the gunhouse. As the deck is covered with silt, it was difficult to determine just how much of the wood deck was destroyed by fire and shells. According to British gunnery reports, there was a large fire in this area.
H. The orientation of Turrets 62 and 64 changed as Bismarck capsized and sank. The loss of Turret 62's after roof plate affected the center of balance of the gunhouse, making it front heavy. We believe that this turret, originally pointed forward, swung outboard during the capsizing and sinking process. Because the ship settled stern first, the gunhouse then rotated another 45 degrees before coming to rest as it is now, pointed towards the port quarter. We believe Turret 64, on the other hand, was shoved inboard by hydrodynamic forces during capsizing, coming to rest with its guns pointing forward instead of abeam.14 The rotation of these turrets attests to the great forces exerted on Bismarck during the capsizing and sinking process and probably explains why the stack, mainmast and forward command tower were missing on the wreck when Dr. Ballard's cameras came upon it in June 1989.
I. Most of the barrels of the 150mm turrets appear intact. The guns of after starboard turret (Turret 65) appear damaged. The most serious damage to an individual secondary turret was to the one on the port side forward.
J. There was severe damage to the base of the funnel and upper portions of the forward superstructure. This resulted in their separation from the main hull upon impact with the water surface during capsizing or from differences in buoyancies. No traces of either the funnel or the upper forward superstructure were found in the debris field. They could be buried in the sediments from the landslide caused on the seamount by the impact of the turrets and main hull. The forward antiaircraft control positions were totally destroyed, with a large hole in the base of the starboard one obviously caused by an explosion of 105mm ready service ammunition in the superstructure. We were surprised to find that although the metal covers were intact at the time of sinking, the forces of the sinking caused them and the equipment they protected to fall away. The two forward hangars were obliterated and reports of survivors indicate that the aircraft burned in severe fires in this area of the ship.
K. The splinter and main side armor belts, particularly on the port side, showed evidence of penetration, especially in the vicinity of the port forward and amidships 150mm turrets (it is important to note that available imagery of the hull of the wreck of Bismarck is minimal). We believe several heavy shells struck aft of the port forward 150mm turret and penetrated into the ship. Splinters from these shells could have caused the ignition of ammunition in the 150mm magazine for turret 64. Mr. Statz has independently confirmed our analysis.
L. There were several shell holes in the aft aircraft hangar and considerable damage to the boat stowage and searchlight platforms over it. The forward bulkhead and doors to the hangar were undamaged, but we believe that anyone seeking shelter within this space was probably killed or injured by shells exploding within. The main mast, located over the hangar, was damaged by shell fragments and severed at its base at the hangar roof. There were numerous holes in the stub of the mast left on the ship.
M. There was a large hole in the vicinity of the amidships catapult on the port side. The size of this hole was perplexing, if it was caused only by shell hits. Upon further analysis, we have concluded that this hole was probably caused by the last torpedo hit on the portside by cruiser Dorsetshire. Information from Mr. Statz has indicated that listing was at 15 degrees when he jumped into the sea at 1030. Dorsetshire's action report states that she made her final run on the port side of Bismarck at 1034, with the torpedo set for a depth of 16 feet. Observers on the British cruiser noted that the torpedo struck amidships. We are now almost certain that this torpedo hit just below the outboard edge of the Aufbaudeck (USN 01 level) near the port catapult position. A 15-degree list to port and water surge into the ship from the 25-45 foot waves makes this a likely event. Most of the energy of the torpedo explosion (750 pounds of TNT) was vented upwards, but there was sufficient energy left to cause the large hole in the Aufbaudeck seen in the overhead view of the damaged Bismarck. This torpedo hit, although not decisive in sinking the ship, did serve to accelerate the capsizing process already underway.4*
N. Many of the 105mm and 37mm gun mounts were missing one or both of their barrels and two 105mm mounts were virtually obliterated. The 37mm gun mounts near the bridge were severely damaged and then swept overboard during the gunnery action. A barrel of one of these mounts is located just aft of the forward conning tower on the starboard side. Mr. Statz remarked to the authors that he distinctly remembers noticing their absence as he escaped from Bismarck via her bridge. Mr. Statz also provided us with the testimony of Seaman Theo Klaus, who was part of the gun crew for 105mm mounts 41 or 43. Mr. Klaus noted that a major caliber shell struck near the base of the starboard antiaircraft director and left a large hole as it detonated 105mm ready service ammunition stowed in the area.
O. There is evidence of a 14-inch shell hit on the face plate of turret Caesar while it was trained towards the port bow. There is a massive semicircular "splash" of fragment holes in the Aufbaudeck (USN 01 Level) where the face plate of this turret would have been positioned. We know from survivors of Turret Caesar that the shock effect of this hit disabled the turret elevating and training machinery.
P. There were three shell hits in the barbette of turret Dora. We believe these to have been from the Rodney. Two of these were penetrations that one survivor believed could have started the fire in the magazine of turret Dora, as reported to the authors by Wilhelm Schmidt. The shell hit on the forward port quarter demolished a segment of the 340-mm barbette armor and ripped a large hole in the Main Deck.
Q. There was evidence of only a few shell or splinter holes in the Main Deck, but some of these could have been covered by sediment now on the wreck. The teak deck is remarkably intact in those areas unaffected by battle damage. Teak is resistant to wood boring organisms, unlike the pine decks of the Titanic. There was extensive fire damage to the wood deck around turret Anton, the aft port quadrant of turret Bruno and the forward port quadrant of turret Dora. The Main Deck of the wreck is not littered with debris, as had been the situation before the ship capsized and sank.
R. The deck plating on the lower bridge deck outside the forward conning tower had two large gashes on the port side and the bulwark on the port side was pushed in. There is a large hole in the superstructure below the port bridge wing. We believe that two 356-mm shells caused this damage to the deck plate and so weakened it that the bulwark collapsed downwards, away from the conning tower surface, on impact with the water. Lighting and shadow effects make analysis of imagery of this area difficult. Mr. Statz has confirmed that these two hits came during the last minutes of the gun battle when both British battleships were at point-blank range. Navigational equipment on the open bridge and inside the conning tower was obliterated by the time he arrived there. He is convinced that earlier hits killed all the ship's command personnel and the Admiral's Staff, including most of those on the open bridge.
S. The remains of what Mr. Statz and we believe was the port boat and aircraft crane now rest on the open barbette of turret Caesar. The violent inrush of water during the sinking process and the partial buoyancy of the crane's boom could have caused this. Mr. Statz has told the authors that the starboard crane had been totally destroyed before he left the ship around 1030.15
T. Although we were not able to observe any shell holes around the port side of the aft aircraft hangar, we do know that a 14-inch shell fired by King George V about 1000 was responsible for the deaths of about 100 men, including the executive officer, CDR Hans Oels. This shell easily penetrated the upper citadel belt (145mm KC) and exploded in the ship's after canteen, some 20-30 feet inside the ship.
9 Force "H" was normally based at Gibraltar for Mediterranean operations. Winston Churchill had ordered the destruction of Bismarck to be a matter of the highest priority and these urgently-needed ships were diverted to join in the hunt for the Bismarck. Winston Churchill's order to his fleet read as follows: "Bismarck must be sunk at all costs and if to do this it is necessary for the King George V to remain at the scene (running short of fuel) she must do so, even if it means subsequently towing her home." Churchill's order to Admiral Tovey, received after the Bismarck had been sunk, infuriated the Admiral, who flung his cap against a bulkhead and retired to his quarters.
10 Ironically, recent evidence indicates that the relatively high striking velocities caused by the short range of the final engagement might have induced British heavy shells to shatter, thus actually decreasing their ability to penetrate. Ed.
11 German usage was to identify turrets from forward to aft alphabetically: Anton, Bruno, Caesar and Dora.
12 To assist in identification, the editors have adopted U.S. Naval practice in which gun installations are defined by both caliber and position. Mount 61, for example, being the most forward 6-inch turret on the starboard side. Whether Bismarck's 150mm secondary battery installations are more properly defined as "mounts" or "turrets" is difficult to resolve and we have chosen to call them turrets here. The turret (or mount) numbers referred to in the text are keyed on Figure 2 [found in Part 1 of this article - Ed.].
13 Based on the testimony of survivors, the authors are confident these anchor chains were severed as a result of gunfire damage during the action of 27 May and not released as a damage control measure to improve the trim by the bow. Naval Constructor Schlüter had recommended on 25 May that the anchors and chains be dropped to reduce the trim by the bow, but this was not done at that time. After the fateful torpedo hit on the evening of the 26th and the succeeding destroyer attacks throughout that night, the exhausted and resigned commanders of Bismarck did nothing to improve the doomed ship's trim by the bow.
14 Mr. Statz, whose memory has been repeatedly shown to be remarkably accurate based on the photographic evidence of the wreck of the Bismarck, is insistent that he escaped by jumping into the water on the port side from between the two guns of the amidships 15cm turret (Turret 64, in our usage), which was trained out on the beam at the time.
15
All four 380mm turrets fell away from the wreck of the Bismarck
as she capsized and sank. Only one of these turrets was detected
in the debris field, lying upside down and buried in the silt.
The following notes are by T. DiGiulian, editor and transcriber for the electronic version of this article.
3* Although these incidents do show that the cartidges would ignite under severe conditions, it is interesting to note that no propellant fires occurred in any of the gun-actions fought by German ships during World War II.
4*The
authors of this article have apparently modified their opinion about the
source of this damage since their corroboration on Dr. Ballard's 1988 book,
"The Discovery of the Bismarck." In that book, this particular
hole was ascribed to "shell hits." When their own book, "Battleships
- Axis and Neutral Battleships in World War II," was revised and republished
in 1990 with the new information from Dr. Ballard's exploration, they then
subscribed to a theory that this damage was from a secondary explosion
of the 105mm ready ammunition. In my personal opinion, this theory
seems unlikely, as the hole damage was mainly on the Oberdeck (USN Main
deck level) while the 105mm mounts with their ready ammunition were a deck
higher on the Aufbaudeck (USN 01 level). The torpedo theory that
the authors now embrace can be further supported by a time analysis of
the Dorsetshire's track and torpedo run times. At 1025 the
Dorsetshire
fired two torpedoes into the Bismarck's starboard side from two
miles away. The Dorsetshire then circled around to the Bismarck's
port side, noting at 1035 that the the
Bismarck had taken up a large
list to port. The
Dorsetshire then fired one more torpedo
at 1036 from just over a mile away. The torpedoes used, the Mark
VII, had a speed of 35 knots. So, it would have taken this last torpedo
just about two minutes to travel the distance to Bismarck, or 1038.
This torpedo was seen to strike amidships, which is the location of the
large hole. Given that the Bismarck was listing to port, it
seems likely that this torpedo was indeed the cause of this damage.
The Bismarck then rolled completely over at 1039 and sank at 1040.