
The conning tower interior
was wrecked and the deck creating the two-level interior structure had
disappeared. Light was streaming in from holes in the roof armor,
where the forward rangefinders had been located, from the riddled port
side armor, and from the forward end, where the deck had separated from
the vertical 350mm armor. Above all, the din of battle was deafening.
Just as he was about to emerge from the hatch into the conning tower, a
14 or 16-inch shell struck the outer surface of the 350mm vertical armor.
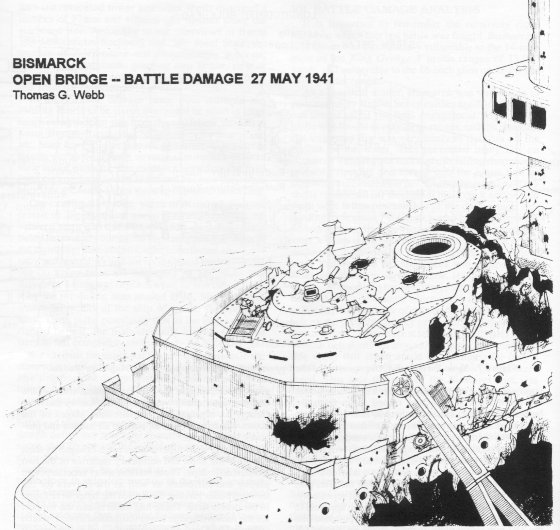
Pictorial view of damage to Bismarck's conning tower and bridge structure. |
Mr. Statz recalls he was momentarily stunned by the shell's explosion and subsequently received a wound some 8-inches long in his left shoulder from a shell from Dorsetshire which passed into the conning tower through the open starboard door. Fortunately, Statz was wearing a leather jacket, while his two friends wore nothing but undershirts to cover their upper torsos. Both these men sustained serious wounds. It took several minutes for Mr. Statz to regain his composure. He was brought back to reality by the voice of an old friend, Lt. Friedrich Cardinal, who had escaped from the forward Main Battery Plotting Station. "Did they get you, Slim?", the officer asked. Cardinal, along with Statz and two seamen named Moritz and Seifert, crawled out of the conning tower onto the port side of the wrecked bridge. Mr. Statz still remembers the very fine red dust on this deck. The group made their way forward and escaped through an opening between the deck and the forward bulkhead of the conning tower.
Shortly after they pulled Moritz to a sheltered position, he died of severe chest wounds. Seamen Seifert lost his senses when the British battleships resumed fire around 0950 and tried to escape by a desperate dive to port from the open bridge. He died as he plunged onto the wreckage below.
Mr. Statz and Lt. Cardinal were alone on the open bridge, although they did encounter a severely wounded officer with four stripes near the port bridge wing. When the British battleships began their final bombardment, the two men decided to move to the starboard bridge wing of the open bridge. There, they tried to find an alternate escape route. Mr. Statz could not see aft due to the heavy black smoke exiting from the base of the funnel. He noticed a large hole near the starboard antiaircraft directors, where all but one of the 105mm starboard gunnery crew escaped. Finding no route down, Statz and Cardinal headed back to the open bridge.
There Statz looked into the open starboard door of the conning tower and noticed five bodies of comrades from Damage Control Central who had escaped before him, one of these being LCdr. Emil Jahreis, his commanding officer and a close friend of the Baron. Lt. Cardinal restrained Mr. Statz from reentering the conning tower, but these two men were forced to take cover quickly as the British battleships and cruiser Dorsetshire began their final close-range passes up the sides of Bismarck. Taking cover behind the forward bulwark of the open bridge, Statz and his shipmate could follow the heavy shells on their trajectories to their impact points on the bridge and conning tower. The terrible noise of these projectiles forced Mr. Statz to stand up and scream in terror. Several shells punched holes in the 350mm armor. Two hit the port bridge wing and carried away the officer they had passed by before.
Once the shelling was over, the two men made their way around the portside of the conning tower and escaped down to the Aufbaudeck (USN 01 Level). From there they jumped onto the middle 150mm turret and dived into the ocean from between its barrels. Mr. Statz was picked up by Dorsetshire, but Lt. Cardinal committed suicide in the waters around Bismarck with a gunshot to his head. This act was one that has haunted Mr. Statz ever since. For a man to have survived such a holocaust and then to commit suicide, just did not seem rational.
The escape route of Baron von Müllenheim-Rechberg was not as dramatic as the one taken by Mr. Statz. After calling Damage Control Central, the Baron found that the ship was being scuttled. Mr. Statz was the man who answered the telephone and it was not until a reunion some 40 years later that they finally met each other! Selecting an opportune time for escape, the Baron and his party left the Aft Command Station shortly after Dorsetshire ceased fire.
The scene outside was out of Dante's Inferno and utter desolation. The protective hood for the aft secondary battery director was still in place, but the machine guns, searchlights, ladders and most other light equipment had been shot away. There were numerous shell holes in the deck and debris was everywhere. One had to be extremely careful not to step into shell holes and plunge into the fires below.
Making his way to an area near the aft 380mm turrets, the Baron noticed serious damage to the main battery turrets. Turret Dora had had one barrel shredded by a direct hit. Turret Caesar seemed untouched, but was silent and its side was blackened with the paint burned off. Resisting the urge to return to his stateroom and pick up some personal belongings, the Baron made his plunge into the sea from the starboard side. He too was picked up by Dorsetshire.
Both German gentlemen are
grateful to their British rescuers. Had they not been picked up by
the Royal Navy, they would soon have died from hypothermia. Tragically,
some 800 survivors of Bismarck had to be left to their fates by
destroyer Maori and cruiser Dorsetshire when lookouts reported
that they had spotted a periscope.
One of the questions we are often asked is, "Did the British sink Bismarck, or did the Germans scuttle her?" Our answer to both these questions has always been
"YES."Based on the condition of the hull, especially in comparison to the after portion of the Titanic's hull, the testimony of Mr. Josef Statz, Wilhelm Schmidt, and Gerhard Junack and the author's examination of the damaged stability analysis of Bismarck, there is no question in our minds that scuttling charges caused the ship to sink at 1040.
Note:
The outboard profile and
overhead view shown below represents the condition of Bismarck as she might
have looked to HMS Dorsetshire after she had fired her last torpedo.
The orientation of the main battery turrets has been corroborated in detail
by survivor testimony. The other damage has been postulated based
on survivor testimony, Royal Navy eyewitness reports, and detail analysis
of photographic and videotape records of the condition of Bismarck's
wreck.

Click on this sketch for a larger image. |
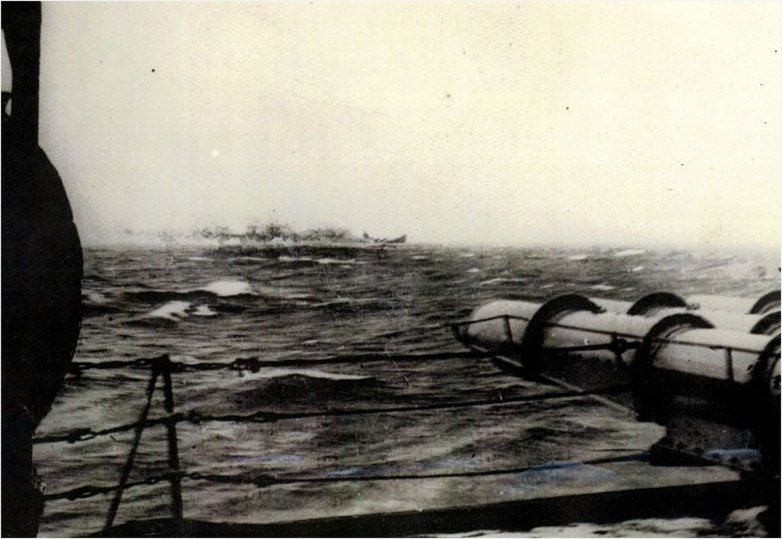
The sinking of Bismarck as seen from HMS Dorsetshire This picture was taken by
Petty Officer L.H. Martin and is shown here by the kind permission of his
nephew, Herb Martin
|
Mr. Statz has provided detailed sketches of damage, as he recalls it. In several instances, we have been able to use videotape and still imagery from the Ballard Expedition to validate the remarkable accuracy of this elderly gentleman's memory. It should be noted that the water surface had almost reached the level of the Aufbaudeck (USN 01 level) by the time he made his escape over the port side from the roof of the amidships 150mm gun turret. Locations of shell hits from Prince of Wales and the torpedo damage from the Swordfish aircraft from Victorious are only approximate, as the underwater hull of the battleship is buried in the silt of the seabed. There is persuasive evidence that there were some penetrations of the 320mm main side belt and the 145mm upper citadel belt by heavy shellfire from the two British battleships.
The damage to the superstructure is at best an approximation. The effects of multiple shell hits must have been much as is shown here. Quite possibly, as many as 300-400 shells hit Bismarck. A more precise analysis is impossible, due to the substantial portion of the superstructure that is missing and the absence of the four main battery turrets, all of which are buried in the sediments around the battleship.
Bismarck was a sinking ship, and her scuttling merely hastened an inevitable demise. Bismarck had been decisively defeated by the gunfire from her British opponents. The order to scuttle the ship was given at 0930, about 45 minutes after the start of the gunnery action, after all main battery turrets were out of commission. By this time, the ship was a total wreck, incapable of defending herself.
By 1000 on 27 May, only one 20mm gun remained operational on board Bismarck. All the 380mm, 150mm, 105mm, and 37mm guns had been disabled. Some shells had holed the armor belts and water was flooding compartments below. Fires had occurred in turrets Bruno, Anton, and Dora; and several 150mm, 105mm, and 37mm magazine fires had forced flooding of magazines to prevent explosions.
The design of Bismarck was vindicated as quite damage resistant; this battleship absorbed a remarkable amount of punishment before succumbing to overwhelming damage. As has been discussed, Bismarck was unusually (perhaps excessively) stable, and the British somewhat hindered their efforts to sink her by bombarding both sides of the ship. Effectively, starboard side battle drainage provided counterflooding to offset the massive damage and flooding being sustained on the port side.
It is interesting to note that auxiliary and machinery spaces in Bismarck were equipped with a small rectangular white box labeled with a red "V" (abbreviation for "Versenken" = Scuttling). The box contained six dynamite sticks, a timer, and a percussion fuze to be placed on inlet sea valves and condenser inlets when the scuttling order (Measure "V") was given. To our knowledge, this procedure was carried out successfully in the center machinery space, the aft port turbo-generator room and perhaps in several other machinery spaces as well. In some compartments, flooding pumps were reversed and charges did not have to be placed. In other spaces, flooding was already occurring and access to scuttling charges was impossible and unnecessary.
Dr. Ballard was surprised
at the relatively intact condition of the wreck. The ship showed
no implosion damage like that found on the after portion of Titanic.
Despite her quick plunge to the bottom, which we estimate took about 6
minutes, Bismarck's hull is upright in bottom sediments in reasonably
good condition, but minus the stern. This strongly suggests massive
flooding/scuttling prior to sinking; structural implosions occur only when
intact watertight compartments are crushed by increasing water pressure
as a sunken ship plunges to the seabed.
Dr. Ballard's expeditions in 1988 and 1989 used the best available location data, which was not very good. As a result, a search of approximately 100 square miles of seabed was necessary. The difficulties of this search were further compounded by the rough terrain of the seabed. Bismarck actually sank on top of a seamount and slid down its side to her final resting place.
The debris field associated with the wreck of Bismarck is chaotic and rather localized, an exception to the norm.16 This unusual situation is explained by the fact that Bismarck was making virtually no forward speed during her last battle while debris from the ship was continually raining down on the seabed below. Late in the engagement, the devastating close-range gunfire from King George V and Rodney often was tearing structure away, and rearranging debris from earlier hits.
Most charts showing the movements of Bismarck during her final battle probably exaggerate her movements - in fact, the ship was only steaming at "ahead slow," good for about six knots in calm seas. In the howling gale pertaining at the time, the ship probably was barely moving relative to the seabed below (see the track chart in Part 2).
The debris fields of warships
sunk in battle may very well not be as structured and searcher-friendly
as those associated with merchant ships. Locating warship wrecks
will probably be much more difficult than locating the wrecks of merchant
ships.
A. Torpedo damage was a critical factor in the destruction of the Bismarck. Overall, we believe that the German battleship sustained a total of six or seven torpedo hits:
1. One torpedo from Victorious aircraft (24 May) struck the main side belt on the starboard side in way of the foremast, causing minimal damage.2. One torpedo from Ark Royal aircraft (26 May) detonated just below the main side belt on the port side, outboard of the port engine room in Compartments VII or VIII, causing moderate damage and flooding. Tearing in the welded seams of the torpedo bulkhead in Compartment VII was reported to Damage Control Central. Flooding occurred in the port shaft alley.
3. One torpedo from Ark Royal aircraft (26 May) doomed the battleship, detonating on or near the port rudder, about 1-2 meters aft of the aft armored bulkhead of the steering gear complex. The steering system was wrecked, with the rudders irretrievably jammed at 12 degrees to port (evidence provided by Baron von Müllenheim-Rechberg).
4./5. Two torpedoes from Dorsetshire (27 May) struck on the starboard side, probably hitting the hull at or below the turn of the bilge as the ship was listing heavily to port.
6. A final torpedo from Dorsetshire (27 May) hit on the port side amidships. This was a shallow runner and actually hit on the 01 level of the listing, sinking the battleship.
7. One torpedo hit was claimed by Rodney around 1000 while she was off Bismarck's starboard side. While this hit cannot be absolutely confirmed, because of the incredible number of shell splashes occurring at this time, we consider this hit to be a probable. If it did happen, it certainly supplemented the Germans counterflooding efforts, which had ceased by 0930 and, ironically, prolonged the sinking process.
In general, the side
protective system of Bismarck performed well against gunfire and
less effectively against torpedoes. The devastating hit aft was far
beyond the end of the side protective layer. Space and volume constraints
limit the application of side protective systems to just over half the
overall length of heavy ships and smaller ships are only protected by subdivision.
No information on the torpedo hits claimed by Rodney and Dorsetshire
can be confirmed. These two ships fired 20 torpedoes in the direction
of Bismarck. However, the erratic movements (particularly
pitch and yaw) of Bismarck and the prevailing gale storm conditions,
make any hits from these torpedoes fired by destroyers during the overnight
battle unlikely.
The wreck of Bismarck is upright, embedded in silt to about the normal waterline. It will probably never be possible to determine with more accuracy the performance of the battleship's side protective system during her sortie into the North Atlantic. Analysis of survivor testimony has led us to conclude that the German battleship's torpedo defense system was only marginally effective against British aerial torpedoes and vulnerable to surface-launched torpedoes containing greater explosive charges.
B. The Radar used by the British heavy cruisers had dramatic psychological effects on the Germans on board Bismarck. Admiral Lütjens was shattered by his difficulty in breaking British radar contact. Several months earlier, while commanding the Gneisenau/Scharnhorst raid into the North Atlantic, the Admiral had been certain German radar equipment was easily superior to that of the British. In May of 1941, however, he was disheartened by the obvious superior performance of the new British radar installations.
Prince of Wales successfully used her Type-284 radar set to determine ranges to Bismarck in the action on 24 May 1941. The gunnery officer used his radar to confirm ranges obtained by his coincidence-type optical rangefinders (Ref. 17). This is why the Prince of Wales, despite her crew's inexperience in gunnery (she was delivered by her builders only seven weeks before the action), was able to straddle Bismarck early on in the action and obtain two decisive hits.5* A third 14-inch shell damaged one of Bismarck's boats.
Bismarck's "Seetakt" radar was put out of order by the shock or blast from her 380mm guns. Although there had been gunnery practice in the Baltic before her sortie, the rapid firing of these guns against Norfolk on 23 May produced conditions not experienced before. No one survived from the gunnery department who could provide evidence on the exact cause for the radar failures. We know from Baron von Müllenheim-Rechberg that all ranging to British ships in the actions of May 24 and May 27 was accomplished by stereoscopic rangefinders.
There was definitely a major distrust of unproven equipment aboard ships in 1941. Radar was a new development, and both Vice-Admiral Lancelot Holland aboard Hood and Admiral Lütjens aboard Bismarck ordered their radar sets secured for fear they would give away their positions. Neither admiral knew the limitations of range for these early radar sets.
Since radar was new in 1941, only a few British ships and aircraft were equipped with it. Several of the Swordfish torpedo bombers from Victorious and Ark Royal were equipped with radar and tried to attack friendly ships in the battle area, since there were no Identification Friend or Foe (IFF) systems available at the time. The use of radar to locate Bismarck in May of 1941 was a noteworthy achievement in the history of the evolution of radar.
C. The Status of the propulsion plant has been analyzed in detail, primarily based on dialogue with Bismarck survivors, supplemented by original sources. Surprisingly, despite the battering sustained by the German ship before her sinking, most of the engineering spaces appear to have continued to function until the scuttling charges detonated or the ship capsized and sank.
Few shells appear to have penetrated to the machinery or magazines within the armored citadel. The 320mm armor plates of the main side belt, supplemented by the 110-mm armor slopes to the lower edge of the main armor, appear to have performed as designed. There were few photographic or video images showing the main side belt, so analysis of such limited evidence is inconclusive. At the close ranges at which the battle was fought, the British 14-inch and 16-inch guns were capable of penetrating the main side belt armor, but the side armor/slopes combination appears to have been infrequently penetrated, if at all. The armor system on Bismarck had been optimized for effectiveness in relatively close-range gunnery actions, although it was inadequate to protect against long-range shellfire. The fragmentary information now available indicates that the propulsion plant continued to operate throughout the action, with only two shells having penetrated into this complex.
An order came from the bridge around 0600: "All engines stop!" This order was not reversed. About 0700, Lt. Gerhard Junack, who temporarily relieved LCdr. Walter Lehinaun, the chief engineer, spoke with Capt. Ernst Lindemann on what should be done with the turbines. Junack was concerned about damage to the hot turbine machinery caused by thermal distortion if it remained inactive indefinitely. The Lieutenant explained his concerns to the Captain regarding the turbines, and the conversation concluded as follows: Junack: "Captain, I recommend an order for 'Ahead Slow'." Lindemann: "Ach, do as you like!"
This response reflected the mood of despair on the bridge. Lt. Junack ordered "Ahead Slow," adequate for a speed of something less than six knots in calm seas.
The distracted officers and men on the bridge of Bismarck failed to observe the British heavy cruiser Norfolk, which mistakenly closed to within 15,000 meters of Bismarck about 0700 that morning. Norfolk actually signaled to Bismarck in the belief that she was King George V!
For all practical purposes, although ten boilers were in operation at the start of the final action, Bismarck was virtually stationary and moving in an erratic manner, due to the stormy sea conditions (Beaufort sea state 6 or 7) and the lack of steering.
D. Welding was a new technology in 1936 when Bismarck was designed. Unrealistically-demanding production schedules led to poor welding, which was exacerbated by cold temperatures which created brittle failure conditions which were encountered in a number of faulty welds after battle damage. If the Bismarck wreck is ever revisited, we recommend a close examination of the main deck and side shell plating aft in the area of the failed stern to confirm the fatigue failure in the stern section. Close examination of the shell plating at the intersection of the hull with the seabed might provide more information on just where the fatal torpedo hit occurred.
E. Structural design details are critical factors in the capability of warships to sustain battle damage and survive. Wherever possible, structure should be continuous with no sharp breaks or discontinuities. Structural openings in the hull should be reinforced. This deficiency in German warship construction practice of the Bismarck-era created areas of high stress which exaggerated damage effects. As far as we know, the Germans were aware of these problems and corrected most of them in Tirpitz while she was in Norway.
F. Redundant structure is a key factor in successful warship design. The structural failure of Bismarck's stern, discussed in detail earlier, is an outstanding example of inadequate structural redundancy. There were no continuous longitudinal bulkheads in the stern aft of the steering gear room, precisely where the fatal torpedo struck. This design defect, massive shell plating damage, stress concentrations and transient whipping phenomena, made the collapse of the stern inevitable.
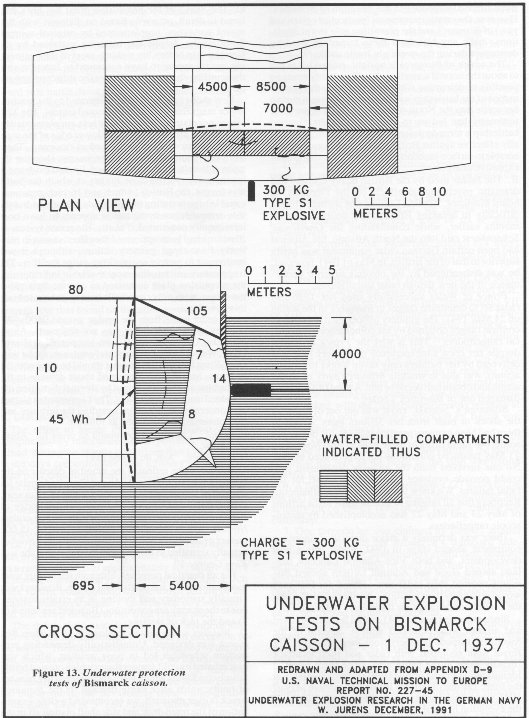
G. Side protective system design was a major consideration in the development of battleship designs. The designed resistance for the Bismarck system was 550 pounds of TNT. This system featured only two bulkheads.17 Although the main side belt armor was arrayed vertically on the exterior shell plating, the Germans and British both used light armor on the bulkheads in their side protective layers to add a degree of ballistic protection. The German design theory for torpedo defense systems was based on tests on sections on the old pre-dreadnought Preussen in the early 1930s.
Bismarck's side protective system consisted of two layers, with the outer layer designed to be kept void and the inner layer designed to be filled with either fuel or ballast water for the system to perform as designed. Such a configuration is normally considered poor design practice, for it permits the direct transmission of damage to the bounding (inner) bulkhead under torpedo attack. American and British designs of this era featured void inboard compartments just outboard of the bounding bulkhead. The figure below depicts the results of underwater explosion tests on a Bismarck caisson in 1938.
A 14-inch shell from Prince
of Wales fell short, followed a short underwater trajectory, passed
under the main side belt, penetrated the side protective system of Bismarck
and detonated on contact with the 45-mm inner bulkhead. Unfortunately
for the Germans, the shell struck at the boundary of Sections XIII and
XIV, near an intersection with a major transverse subdivision bulkhead,
causing tears to develop in the welded joints and the plating of the transverse
and longitudinal (inner) bulkheads. Slow flooding ensued, eventually
causing the loss of a generator room and one of the firerooms. This
hit revealed a deficiency of the Bismarck armor system-inadequate
lower side belt armor protection against plunging shellfire.
 |
H. Rudders and steering gear are an unavoidable Achilles heel in the protective design of warships. The Bismarck episode has shown that auxiliary steering devices for warships are desirable attributes if space and weight are available and if the systems can be made moderately effective. Auxiliary rudders can have a place in modern warship design. The auxiliary propulsion devices fitted to the FFG 7 Perry-Class frigates and the Spanish aircraft carrier Principe De Austrias are examples of such systems. However, these systems absorb space and weight, premium items in modern combatant ship design.
I. The arrangement of the steering gear of Bismarck contributed to her demise. The two rudders had to be located very close together in order to be positioned properly in the propeller races. It is possible that the torpedo hit aft damaged both of Bismarck's rudders. In American battleships with quadruple screws the rudders were spaced further apart. The twin skeg arrangement of later American battleships, also used on the Midway class carriers, contributed a degree of protection to the shafting and provided better flow to the rudders and propellers. The Iowa-class battleships, for example, could outmaneuver most destroyers of the World War II-era and care had to be exercised by destroyer skippers when maneuvering close to these ships.
Bismarck was equipped with push button steering, as were all German warships of this period. The helmsman would hold both hands on to a bar and with the palms of his hands press down on switches to turn port (left hand) or starboard (right hand). With the din of battle and the necessity to read the rudder indicator to determine his rudder positions, undoubtedly the helmsman, Quartermaster Hans Hansen of Bismarck, was hard pressed to make the maneuvers ordered by Captain Lindemann during those crucial moments when she was under torpedo attack. Modern German warships have abandoned this concept as part of a human factors evaluation.
J. Smoke enshrouded the sinking Bismarck, due to extensive fires throughout the ship and the fact that all her forced draft blowers had been disabled, causing the boilers to operate without adequate air intake. In addition, according to Mr. Statz, there were fuel-oil fires in some of the boiler rooms. The stack was riddled and was so weakened structurally that it sheared off at its base when Bismarck capsized.
So much smoke was pouring from riddled uptakes that carbon monoxide gas entered holes aft of the stack and asphyxiated men not using gas masks. Paint in this area was also burning. Mr. Statz has noted that Compartment XIII on the armor deck had such a massive concentration of gas and fumes that he was unable to move to the after part of the ship.
K. Command and control spaces are always key targets for enemy fire. During the battleship era, relatively heavily-armored conning towers were normally provided to protect key personnel. Bismarck's conning tower was shielded by 350mm armor, which was riddled by close-range British battleship gunfire. Stability considerations often influenced the design of conning tower protective schemes. The British radically sacrificed such protection and all but two personnel on the unarmored bridge6* of Prince of Wales were killed by a dud 380mm shell fired at long range. Maximum attention must be paid to protecting these key functions, by dispersion and by locating key elements below the waterline, for example.
L. Corrosion has taken a remarkably modest toll on the wreck of Bismarck, despite the passage of 50 years. The face-hardened armor shows rusticles on the barbettes and main side belts. This may be due to galvanic corrosion, since the face hardened armor and the high strength steel backing structure are somewhat dissimilar metals. Inevitable irregularities and small cracks in the surface of face hardened armor also can foster corrosion and the development of rusticles.
Other surfaces show remarkably less corrosion than was observed on Titanic's hull. This was probably because the paints have adhered better, the wreck had 30 years less time on the seabed and the greater depth inhibited deterioration. The teak decks, in areas not damaged by shellfire or fire, are in a remarkable state of preservation.
The overall superior condition
of Bismarck can be attributed to advances made in paint and preservative
technology from 1932-1939.
"Not very well!"The American Iowa-class battleships were armed with powerful, long-ranged 16-inch guns which fired a heavy 2,700-pound armor-piercing shell and benefited from a superior gunfire control system. Furthermore, the Iowas were capable of 33-35 knots maximum speed. Their higher speed and superior horizontal armor protection would have given the Iowas an immense tactical advantage in a long-range gunnery engagement. Their high speed would have granted the Americans choice of engagement and they would have been able to dictate the range at which to do battle. At long ranges, the American 16-inch guns could penetrate Bismarck virtually at will, while the German 380mm gun could only hope for combat system kills against the always vulnerable superstructure of any battleship. U.S. Navy doctrine in the period leading up to World War II was to attain great gun accuracy at long range, for that is where American admirals wanted American battleships to engage a potential foe. By 1944, with their clear advantage in radar technology and superior fire-control systems, the advantage in gunnery engagements would have been conferred even more markedly on the U.S. ships.
The German ships were admirably suited to a close range battle, such as might be expected in the pre-radar era in the North Sea. At close ranges, the German ships might have had a slight advantage over their American counterparts.
The side protective system of the U.S. ships was superior to that on the German warships, although both classes were equally vulnerable to the type of torpedo hits on the steering gear which doomed Bismarck.
Overall, although one can
never predict the outcome of a one-on-one engagement with certitude, it
is clear that the odds in any such a confrontation would have substantially
favored the American ship.
Admiral Lütjens, unaware
of a number of these circumstances which increased the odds against his
success, was pessimistic regarding his chances of evading the Royal Navy.
While visiting Rear Admiral Hans Voss, a long-time friend in Berlin upon
his return from the North Atlantic in March 1940, Lütjens told him
that he did not think that he would return alive. If the Hood
Board of Inquiry had convened with the evidence that is now available on
German ordnance, the 8mm film clip taken by Paul Schmalenbach aboard Prinz
Eugen and the tracks of the ships involved, it is our belief that it would
have found the loss of Hood resulted from the following factors:
Bismarck was very
vulnerable to long-range gunfire. Admiral John Tovey's decision to
engage her at close range increased the probability of shell hits, but
made it more difficult for his shells to penetrate her vitals. Our
observation of the wreck indicated that the superstructure was devastated
by shell damage. Survivor testimony has indicated that the main battery
turrets were all struck by 14 or 16-inch shells and were disabled by 0930.
At the time the ship was abandoned by her crew, only one 20mm gun was still
operational.
Once Bismarck had been put in a near-defenseless posture, her hulk could probably have been quickly dispatched by a concentrated torpedo attack from the portside of the German battleship. Twelve Swordfish aircraft, armed with torpedoes were present in the battle area but were ordered to stay clear of Bismarck, evidently because Admiral Tovey, afraid that they might attack a friendly ship, ordered them away. Torpedoes are a much more lethal threat to warships than gunfire.
Furthermore, with the heavy cruisers firing from starboard and the battleships from port, the British tactics actually prolonged the battle, effectively augmenting the German's counterflooding efforts, which had been abandoned around 0920-0930.
Bismarck stood up well to the punishment she received. The machinery plant remained in operation to the end, but the turrets did receive disabling hits. One survivor remarked that several of Bismarck's turrets were hit by 16-inch shells from Rodney and that the 380mm guns still could be fired, although the turrets could not be trained. Evidence of a 14-inch shell hit on the 340mm KC barbette armor for Turret Bruno is probably from the hit which caused an internal explosion which blew off the 320mm armor backwall. Traces of this armor are in the debris field.
Bismarck was a handsome warship, well designed and well fought during her brief and tragic combat career. She now rests on the Atlantic seabed, upright, defiant and proud; a memorial to the valor of German and British sailors who wrote an indelible chapter in the history of war at sea, now over fifty years ago.
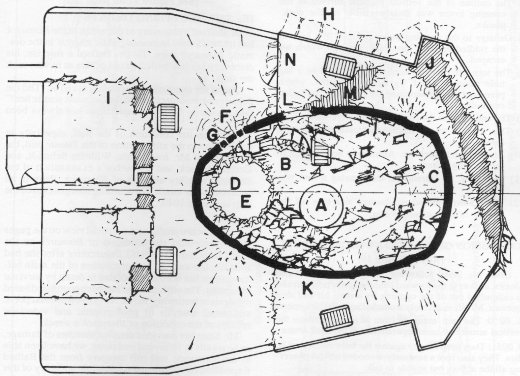
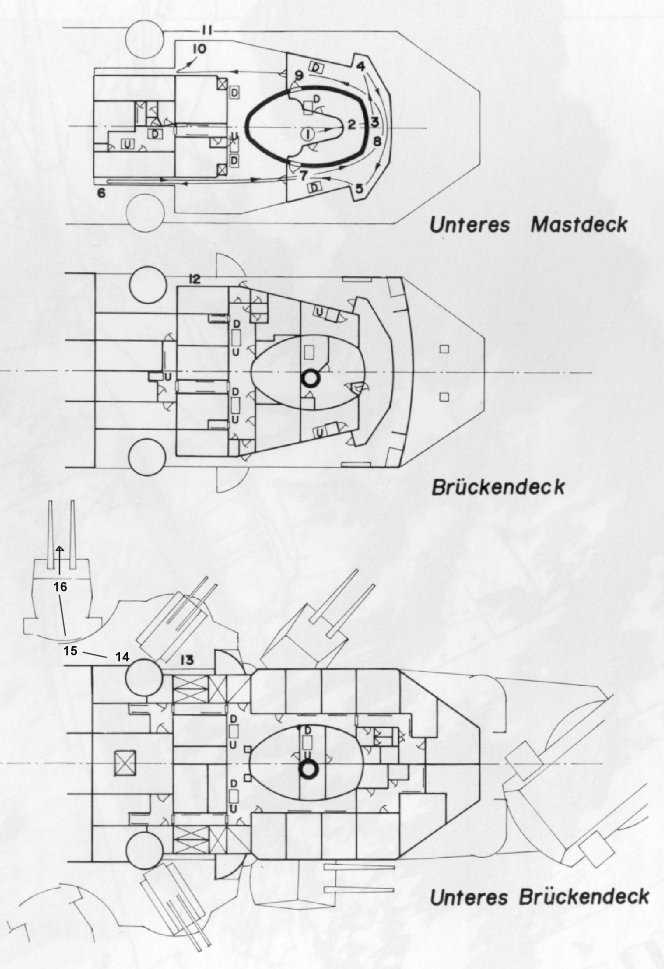
The above sketch is by Thomas G. Webb. Mr. Statz's Observations of Bismarck's Bridge A) Top of conning tower tube.Translation of Mr. Statz's sketch notations: I have recorded everything to the best of my recollection on the attached sketch. I did not notice any heavy damage to the rear portside of the conning tower. Naturally, the director had been destroyed. 1) Emerging from the cable shaft into the conning tower. |
 The above sketch is by William Jurens.
The letters "U" and "D" on this sketch represent the up and down ladderways. Click on this sketch for a larger image. Discussion of Mr. Statz's Escape Route 1) 0948: Mr. Statz, following his comrades Seifert and Moritz, arrives in the forward conning tower position and is catapulted out of the opening by a shell hit and ship motions. Moritz is severely wounded by a shell fragment. |
Although we did not participate directly in Dr. Ballard's expedition aboard the Star Hercules, we gave advice and counsel to his personnel and did much of the photo interpretation. We were greatly aided by three Bismarck survivors, former German Ambassador Baron von Müllenheim-Rechberg (former LCdr. German Navy) the senior surviving officer, Mr. Josef Statz, who was the sole survivor from Bismarck's Damage Control Central,18 and Paul Rudek, who was from the forward computer room. The Baron and Mr. Statz worked tirelessly with the authors and assisted in the preparation of Mr. Thomas Webb's drawings of Bismarck just before she sank. The help of Mr. Statz has been extremely important, for he was a knowledgeable marine designer who served in an important, if not crucial, space on Bismarck. Mr. Rudek clarified the number of salvos fired at Hood. These views of the damaged Bismarck were prepared after many hours of intensive study of the videotapes and still photography brought back by Dr. Ballard's team from some 15,317 feet below the water surface, 600 miles west of Brest, France. A number of these views have been published in various magazine articles and books (Refs 19, 20, 21 and 22). We have been fortunate in gaining a sound insight into the Bismarck saga from the standpoint of the Royal Navy. For this, we would especially like to thank Admiral of the Fleet Sir Henry Leach and several Prince of Wales officers: Captain Cohn McMullen (gunnery); Commander Arthur Skipwith (executive officer); Lcdr. Geoffrey Brooke (gunnery); and Vice Admiral D.B.H. Wildish (then Lt., damage control). Lcdr. Brooke was extremely helpful in reviewing an earlier version of this manuscript and is also the author of "Alarm Starboard," which was helpful in assessing the events of the 24 May 1941 battle from his vantage point on Prince of Wales.
We also would like to thank Messrs. William Jurens and Nathan Okun for their invaluable assistance. Mr. Jurens' article on the loss of HMS Hood in Warship International, No.2, 1987, was extremely helpful in our analysis of the loss of this battlecruiser. Mr. Okun, an expert on armor penetration phenomena, has completed a remarkably comprehensive and convincing analysis of the ballistic protection of the Bismarck, unfortunately as yet unpublished. Overall, he concludes the ship was not as well protected as her legend would indicate. None of this, of course, detracts one iota from the drama of the Bismarck chase and the achievements of her crew.
Thanks also are due to John Campbell and David Brown for their commentaries on an earlier version of this manuscript.
Wolfgang Reuter, a German-trained naval architect who assisted in this analysis by providing translations and analysis of Mr. Statz' s remarkably extensive correspondence and reports. Mr. Henry Brodersen also assisted in translations.
We especially want to thank our illustrator, Mr. Thomas Webb, for his generous assistance in making areas of the Bismarck wreck, not visible to the camera, come alive to the human eye. Tom was guided by the critique and very helpful assistance of the Baron and Mr. Statz who reviewed his early sketches of the damaged profile and overhead view.
We have been aided in our analysis by our experiences as naval architects and marine engineers. Although some of our analysis is subjective, we have had the opportunity to analyze battle damage experiences of many warships the insights from these analyses have led to many of the conclusions presented in this article.
Comments on our work are
welcome, as they can further our understanding of this important naval
battle of World War II. In this regard, we want to thank Arthur Sandiford
for his comments on our Marine Technology article which improved this article
in Warship International. Whenever matters of fact are discussed,
specific citations of sources of information would be most helpful.
2. Ballard, Dr. Robert, Discovery of the Bismarck, Toronto, Ontario: Madison press, 1990.
3. Ballard, Dr. Robert, "Quest for the Bismarck," (London) Sunday Express Magazine, 29 October 1989 and 5 November 1989.
4. Ballard, Dr. Robert, "Finding the Bismarck," National Geographic Magazine, November 1989, pp. 622-637.
5. "Die Entdeckung der Bismarck," GEO Magazine, December 1989, pp. 14-36.
6. U.S. Navy Department, Bureau of Ships, Preliminary Design Branch, Study of Bismarck. Washington, D.C.: December 1942.
7. Dulin, Robert O., Jr. and Garzke, William H., Jr., Battleships - United States Battleships in World War II. Annapolis, Maryland: 1985.
8 Garzke, William H., Jr. and Dulin, Robert O., Jr., Battleships - Allied Battleships in World War II. Annapolis, Maryland: Naval Institute Press, 1990.
9. Garzke, William H., Jr. and Dulin, Robert O., Jr., Battleships - Axis and Neutral Battleships in World War II, Annapolis, Maryland, Naval Institute Press, 1990.
10. U.S. Navy Department, Bureau of Ships, USS South Dakota, Gunfire Damage, Battle of Guadalcanal, 14-25 November 1942, War Damage Report No.57. Washington, D.C.
11. Garzke, William H., Jr. and Dulin, Robert O., Jr., "Who Sank the Bismarck?", U.S. Naval Institute Proceedings, June 1992 pp. 48-57.
12. Statz, Josef (ex-Bismarck) Letters to Mr. William H. Garzke, 1989-1994.
13. Müllenheim-Rechberg, Baron von (ex-Bismarck) Letters to Mr. William H. Garzke, 1965-1993.
14. Junack, Lt Gerhard, (ex-Bismarck) Letters to Mr. William H. Garzke, Jr., 1966-1967.
15. Schmidt, Wilhelm (ex-Bismarck) Letters to Mr. William H. Garzke, 1982.
16. Garzke, William H., Jr. and Dulin, Robert O., Jr., "Review of Dr. Ballard's Photography of the Wreck of the Bismarck for the Battleship Bismarck Survivors' Association," August 1990.
17. McMullen, Capt. Colin (ex-Prince of Wales) Letters to Mr. William Garzke, Jr., 1967-1968, 1990-1991.
18. Brooke, LCdr. Geoffery, (ex-Prince of Wales) Letters to Mr. William Garzke, Jr., 1990-1991.
19. Brooke, Geoffery, "ALARM Starboard," Cambridge, United Kingdom, Patrick Stephens Limited.
20. Wildish, Vice Admiral D.M.B. (ex-Prince of Wales) Letters to Mr. William H. Garzke, Jr., 1970-1991.
21. Skipwith, Cmdr. Arthur (ex-Prince of Wales) Letters to Mr. William H. Garzke, Jr.
22. Garzke, William H. Jr. and Dulin, Robert O. Jr., "The Bismarck Encounter," Chesapeake Section, SNAME, 5 June 1992.
23. Garzke, William H. Jr. and Dulin, Robert O. Jr., "The Bismarck Encounter," 10th Naval History Symposium, U.S. Naval Academy, September 1991.
24. Jurens, William J., "The Loss of HMS Hood - A Re-examination," Warship International, No.2, 1987.
25. Okun, Nathan, "Armor Protection of KM Bismarck," unpublished mss.
26. Schofield, VICE ADM. B.B., Loss of the Bismarck, United States Naval Institute, Annapolis, Maryland, 1972.
27. Leach, Admiral of the Fleet Sir Henry, Letters to Mr. William H. Garzke, Jr., 1980-1981, 1990-1991.
28. Garzke, Wiliiam H., letters to Paul Rudek, 1990 and telephone interview conducted by Stephan Reuter.
29. Garzke, William H., Dulin, Robert O., Brown, David K., Harris, Stewart and Yaeger, Dana: "Deep Underwater Exploration Vehicles, Their Past, Present and Future," Centennial Transactions of the Society of Naval Architects and Marine Engineers, 1993.
17 The USS North Carolina design was based on a five bulkhead configuration, while the later South Dakota and Iowa configurations featured four bulkheads with a sloping armored belt imbedded within the system. The British King George V/Prince of Wales system was based on a three bulkhead arrangement.
18 This Bookmark does not exist in the original printed version of this article and it is unknown what it referered to.
The following notes are by T. DiGiulian, editor and transcriber for the electronic version of this article.
5* Please see note 2* at the bottom of Part 1 of this article in regards to Prince of Wales' use of radar at the Denmark Strait battle.
6* Specifically, the Compass Platform.